
This week marks the end of the project and the final hand-in! You can view the trailer and raw gameplay down below.
Week 13 – Polish
The last week and a half has currently consisted of purely polishing the level as well as finishing off the actual playable area and blocking off the areas outside the level.
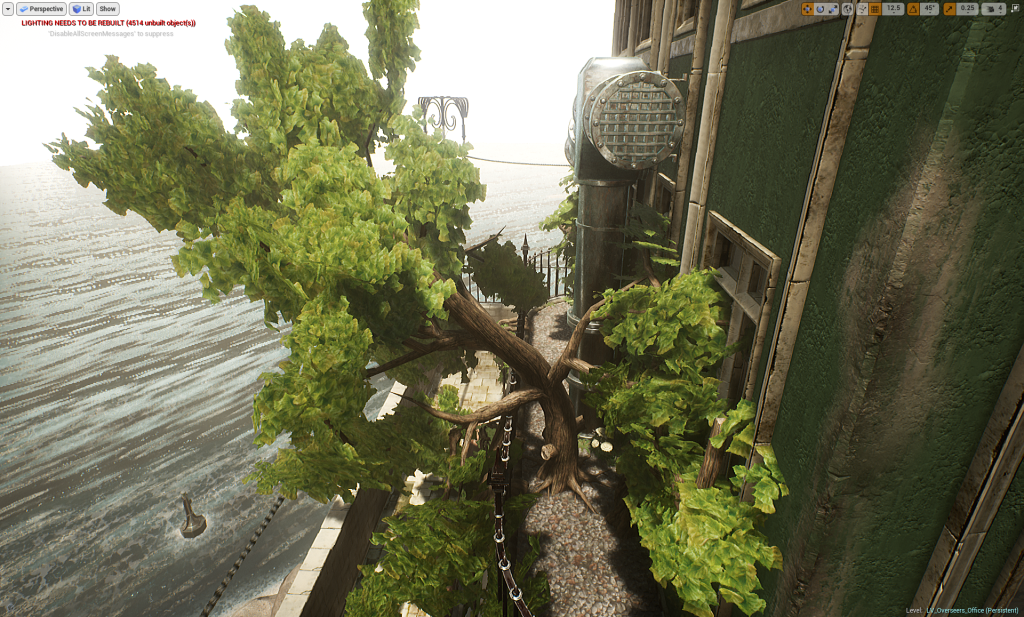
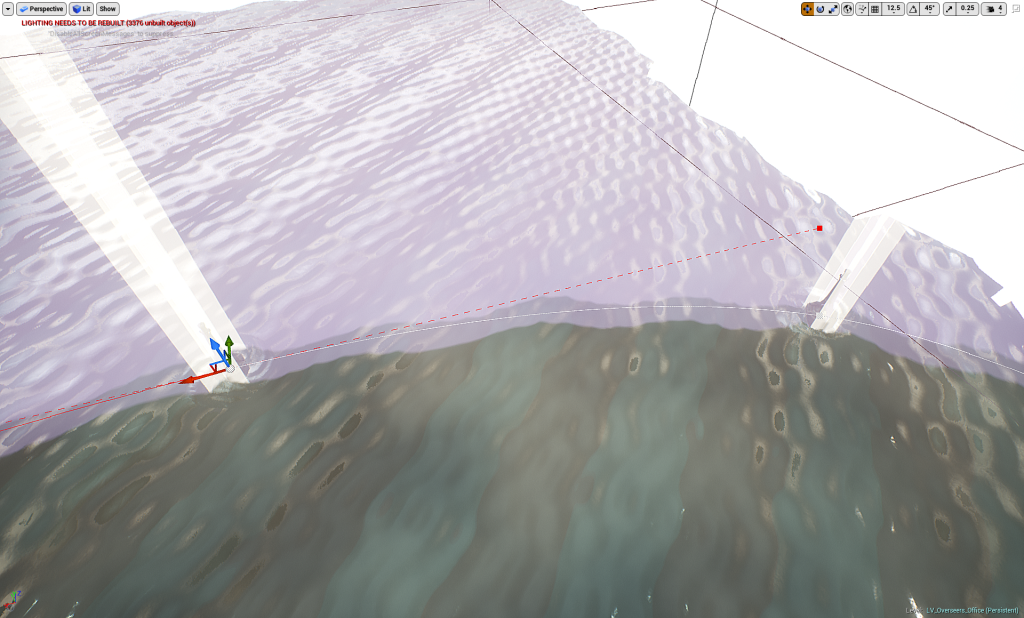
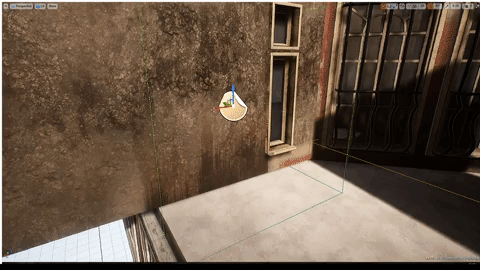
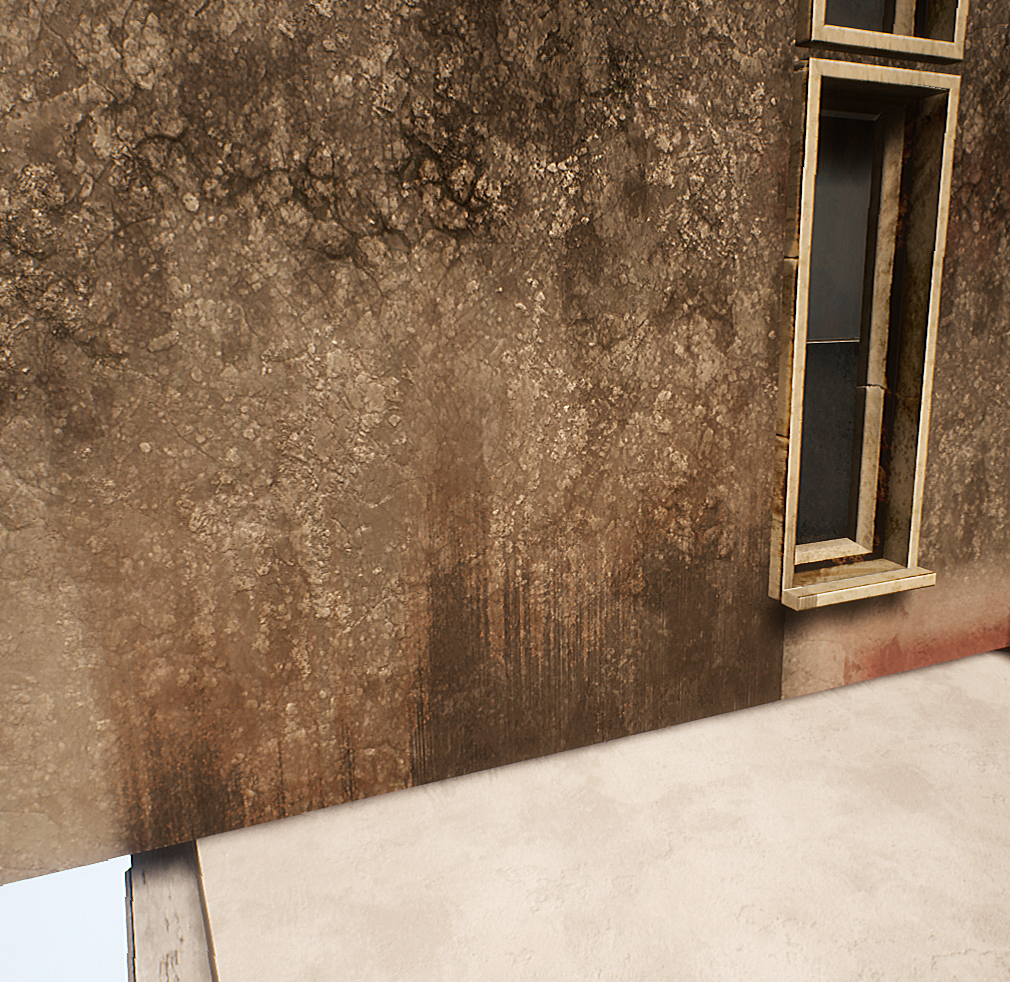
To help further the idea that the player is inside a world larger than themselves I created a bunch of foliage assets like trees & ivy to make it feel more lived in, as well as adding in a landscape to represent the sand to mold the sea area and provide build-up of sand deposits where it makes sense.
Sand Material & Landscape Shader
“It’s coarse and rough and irritating and it gets everywhere”.
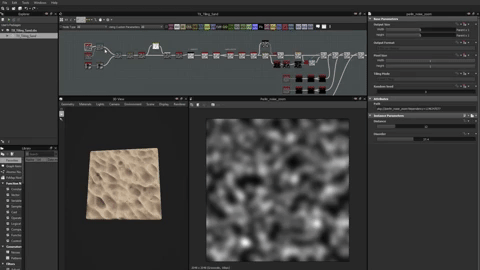
On the serious side of things creating the sand and landscape shader was a long process, though due to the player being unable to see much underwater I didn’t bother with variation textures. To break up the surface below the waterline I just used rocks.


To start with I first developed the sand textures in Substance Designer by starting with perlin noise which I manipulated with a serious of warps, directional blurs, slope blurs, and custom pixel processing in order to build the height map which drives the rest of the substance.
The pixel processor and slope blur (with negative values) was the main driving factors to this material. Big thanks to Bruce Slater for leading me to the function 1-(abs(sin(in)) which was originally something I explored for a more optimised water simulation (though only is useful in scalar displacement as opposed to vector displacement which gerstner provides).
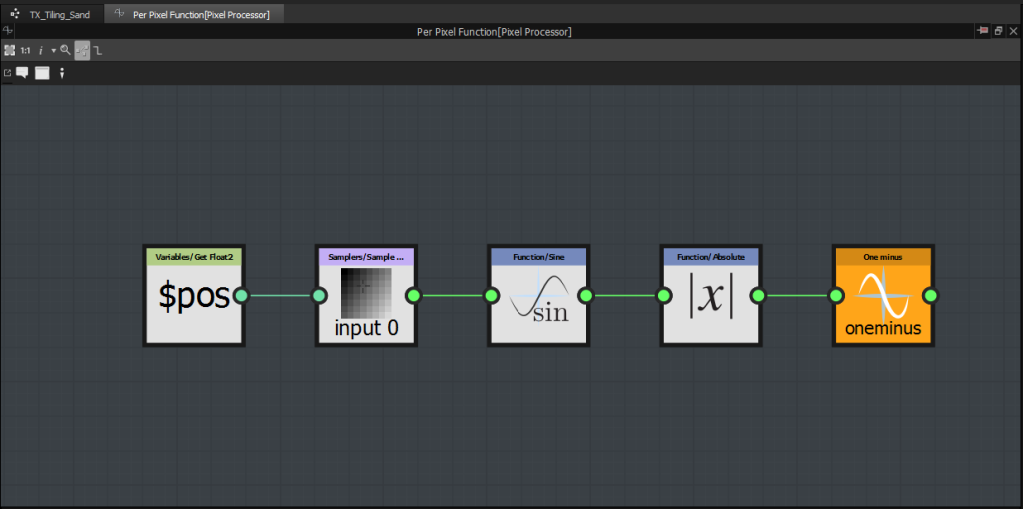
This function essentially provides waves with sharp peaks and soft valleys which was useful here, and then by using slope blur with the input as the intensity you can bulge the map or pinch with negative values.
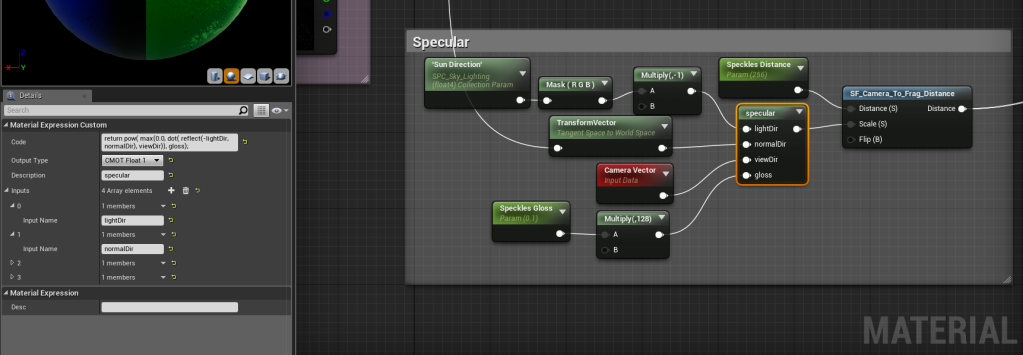
The shader for the sand material uses the master base shader function but with added features such as parallax occlusion mapping, dynamic distance field flow mapping, & a secondary specular calculation (to add the speckles).


The secondary specular is simply a tiled noise map multiplied by directional specularity. The calculation for that is written in HLSL to gain access to the reflect() HLSL function. It should be noted this calculation is not physically accurate and is limited to the directional light due to the nature of the deferred renderer, if I wanted to make this physically accurate I would have to compile a custom engine build to inject my own BRDF which isn’t worth it for a small effect which can be faked in.
The flow map side of things works the same as the water shader (I have modularised into its own shader function in fact) by using distance mesh fields to find the XY gradient between surfaces and distort the coordinates using this. This is useful to make the sand feel more natural as it would gather and be pushed around surfaces.
I considered adding in flow map painting to distort the sand with custom painting, though I didn’t feel as though it was worth the time to implement.
Foliage
Foliage always helps to push a scene in terms of art, but here it not only helps to fill out the space but make the world feel more natural and lived in.
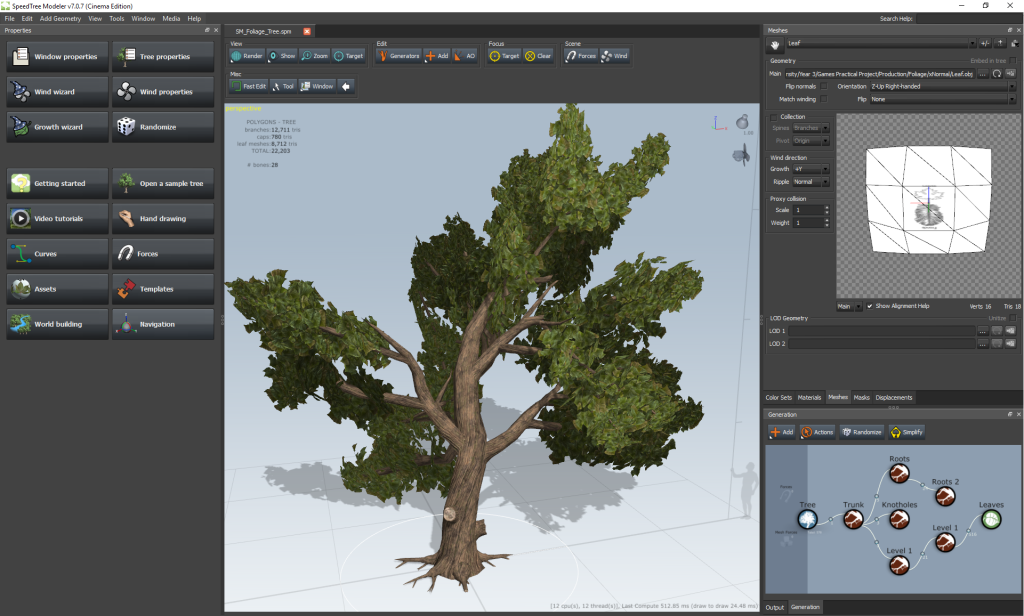
To create the foliage I first created the textures I needed – I started this by first updating the leaves from the procedural texture I initially created to one generated through a bitmap. This gave me a much more accurate albedo at the expense of a poorer normal – though in this case I don’t think it matters too much.

To clean and edit the bitmaps I used Substance Designer which massively sped up the process, and also has nodes for cleaning up scan data (which this technically is in a sense). For example I generated ambient occlusion and removed this from the albedo.
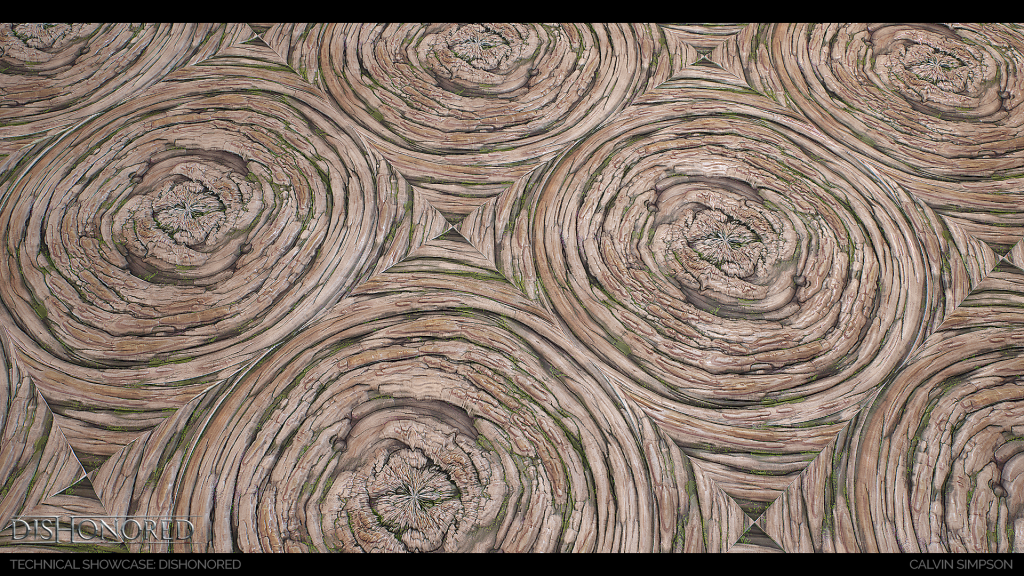
I used Substance Designer to create the bark as well, though I wanted to gain a nice mix between stylisation and realism with a focus on the larger forms instead of the tertiary detail so I opted for a procedural workflow here. I used reference from both the game, and actual scan data I processed prior to this project (only as a point of reference though, you can visit my shameless photogrammetry plug here – https://www.artstation.com/artwork/zR9D6). I also referred to this guide to help me get started with the larger forms – https://www.artstation.com/artwork/AgJ1V.
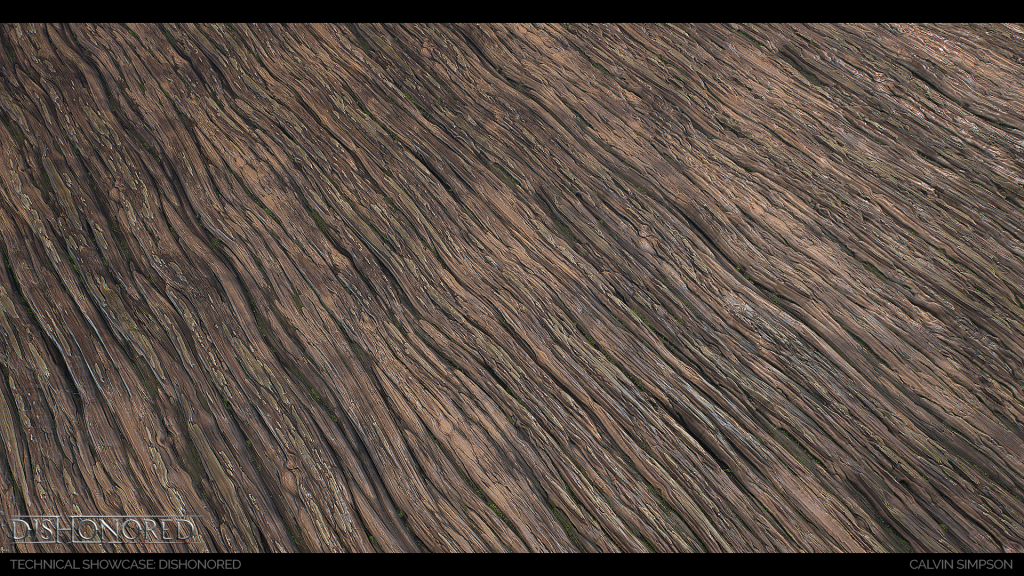
This bark Substance helped me to create the bark ends (the caps left where branches are pruned by SpeedTree) by converting from Carteasian to Polar space and working from there. It should be noted this texture was not intended to tile as opposed to the bark.
With these textures in place I then just used SpeedTree to quickly generate the spines I needed with my materials set up. This is an extremely powerful workflow I found as I can procedurally generate the foliage I need, as well as use forces to drive the generation (such as wrapping ivy along a wall).
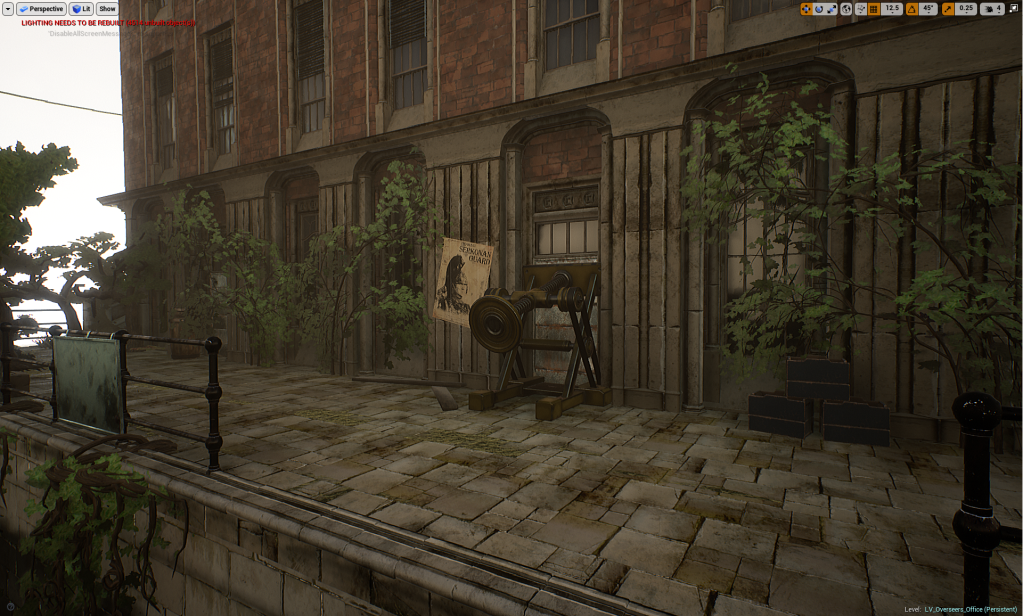
Posters
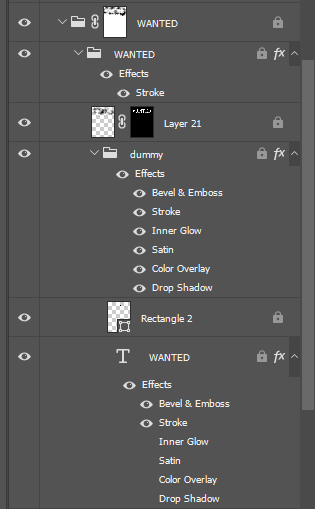
I also re-created some posters from Dishonored 2 & Death of the Outsider with some slight changes. I did this from scratch in Photoshop using references by overlaying images and painting in areas, though I made good use of smart objects, layers, grouping, and FX layers to keep things as non-destructive as possible! In places I even layered up FX adjustments using groups which was useful for complex fonts etc.
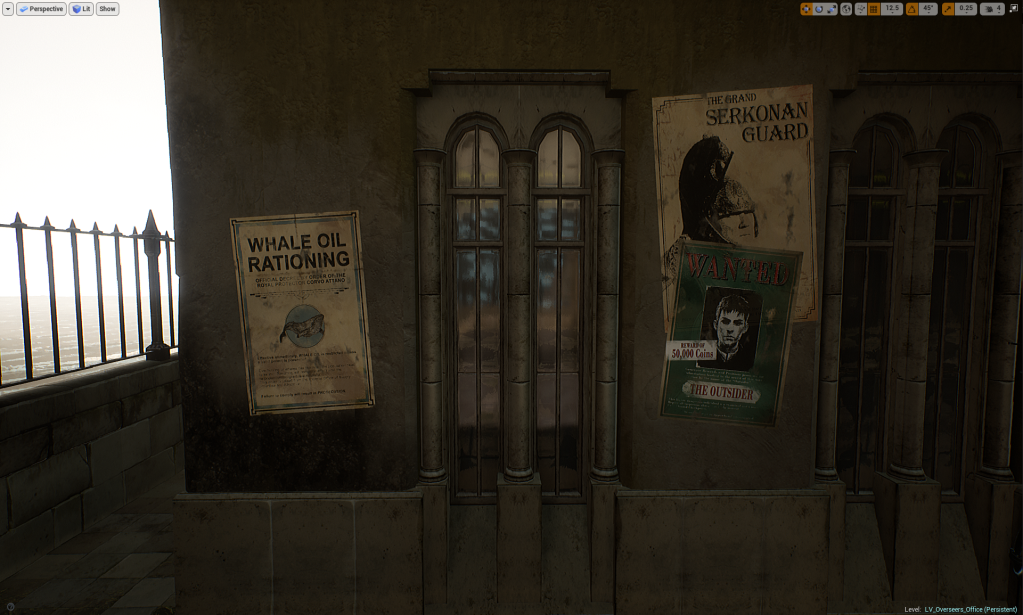
These were very useful to add narrative and help further the idea that the world exists both around the player and as a result of the player’s actions to give a sense of player agency. For example the wanted posters are referring to “The Outsider” which is the player.

Where Now?
As of writing this post there is just over a week until the project hand-in. Everything is all set up and ready to go. At this point everything can be handed in and I would happy with it too, though I will continue to polish up the areas & adding small things I think will benefit the project.
I also need to do a final lighting bake though I will wait until I’m 100% happy with the improvements before I do this.
Week 10, 11, & 12 – Level Production & More Assets
The past 3 weeks have been a bit slower in terms of production due to personal reasons and organising stuff for my soon move to work at Sumo Digital.
I’ve mostly focused on level production & creating more assets over this period of time, and for the next few weeks will close off the level, develop a polish listing, and then work through that to make adjustments as required – namely art-based.
I also spent one week of this time writing my dissertation to free up time & stress to further polish the project.
Level Production
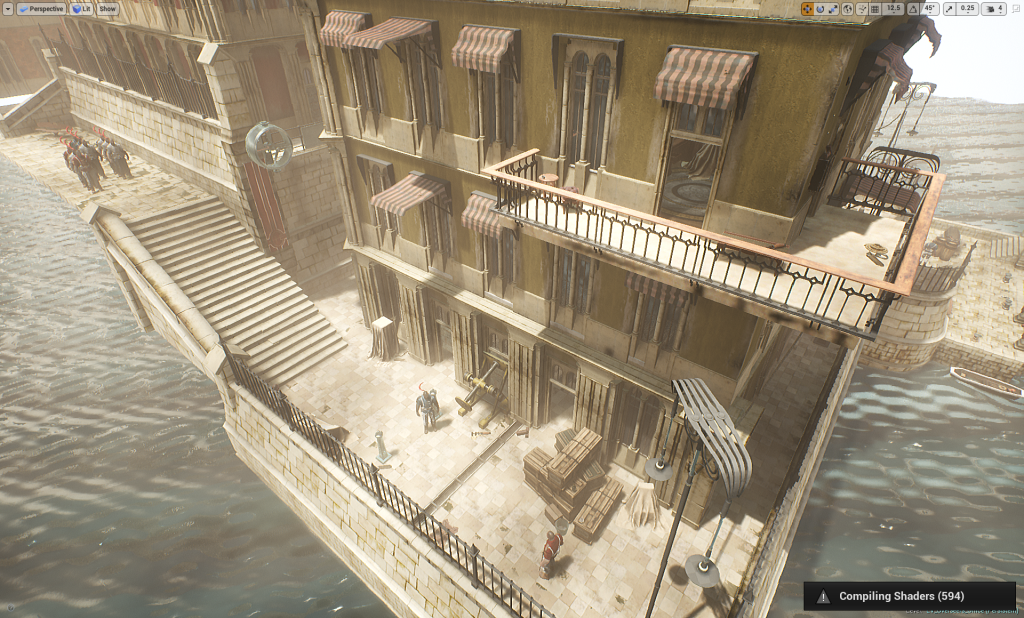
The level production is an iterative process which will is being constantly refined by adding smaller areas and props to fill out the space.
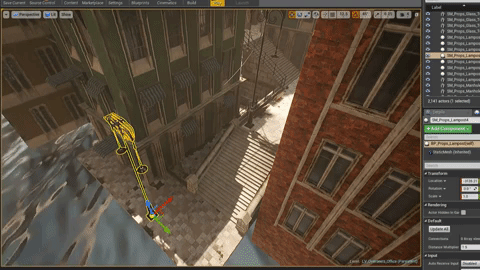
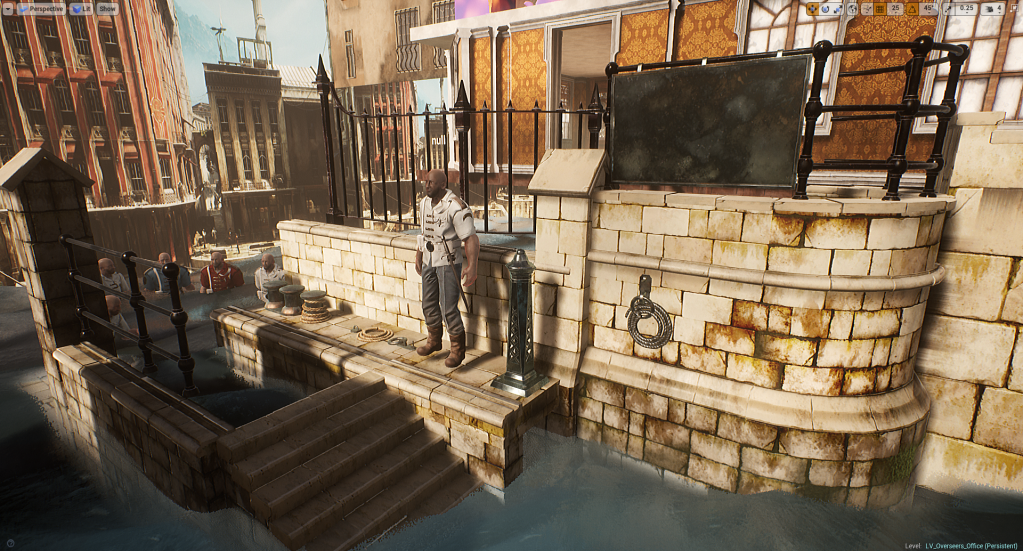
From here I will be closing off the level & refining the art for the existing sections and adding details such as environment narrative elements & infrastructure (i.e. the lampposts, drains etc).
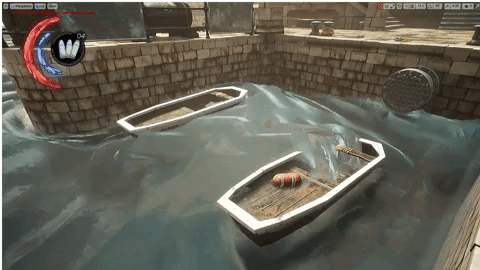
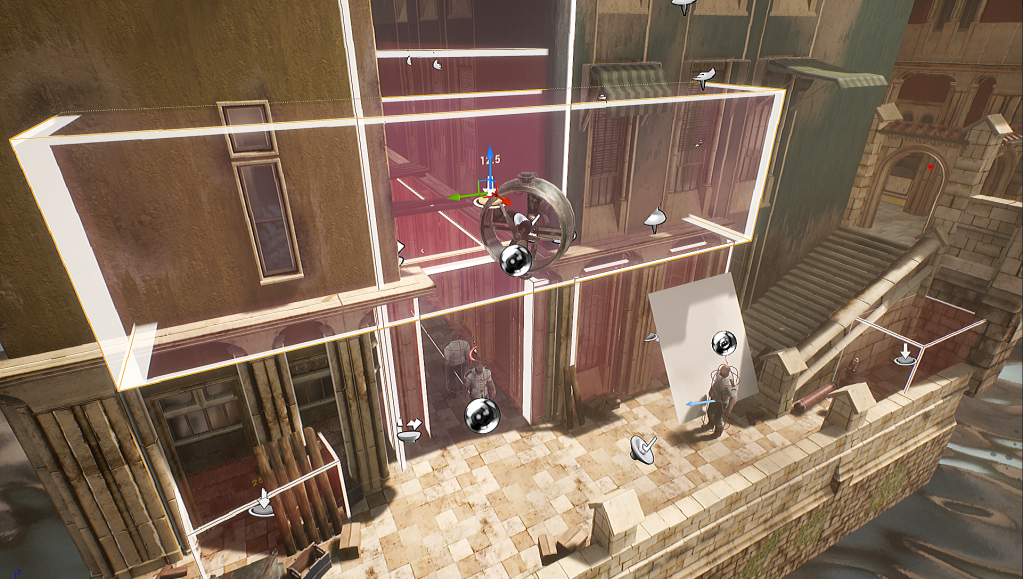
To help block the player off from accessing areas outside the level I developed a quick spline based tool which adds buoys at each spline vertex (with buoyancy and a random rotation to remove repetitiveness), and generates a collider along the spline to create the bounding box.
Buoyancy & Dynamic Flow Mapping
I’ve also added buoyancy to elements in the water along with dynamic flow mapping to allow the water to flow around objects. My approach to the buoyancy does not match with the water’s simulation as this is both too expensive without using multiple render targets so an approximation works fine. The approximation generates sin waves based on world position so everything bobs at different rates. This is controlled through an ocean controller (an actor which drives the values) so everything is consistent.
I had to do this via scripting to affect collision as using world position offset or displacement in the vertex or geometry shaders respectively is done at GPU time so it would not affect collision.
Dynamic Elements
I’ve also worked on making the scene more dynamic with rolling fog, particles, and props such as fans. This is also backed up by other small elements such as wind rolling through the canopies.
I also updated the screen space fog shader to utilise rolling fog generated using 3D noise – this gives a more volumetric feel to the fog instead of it being very static.
Art Production
These are the assets I’ve worked on – they are made using the same prop workflow as I’ve been using over the course of the project. I’ve also been experimenting with further optimising my use of texture space – for example the back of the mirror is the same as the front which is re-welded back into place. This idea has been essential for the level of detail on areas such as the cabinet which covers a large surface area.
Material Extension
I’ve also been experimenting with secondary reflections & anisotropic contribution in Toolbag 3 and seeing how I can bring any of that over to UE4. In the process of this I looked into this article aimed at graphics programmers about rendering in Far Cry 4 – https://www.gdcvault.com/play/1022235/Rendering-the-World-of-Far.
While distorting the reflection itself is not something I can do in the base surface shader (I would need to write and inject my own BRDF in a custom engine build), I managed to engineer the anisotropic specular highlight itself as a shader function.
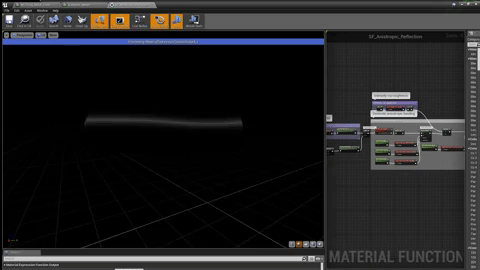
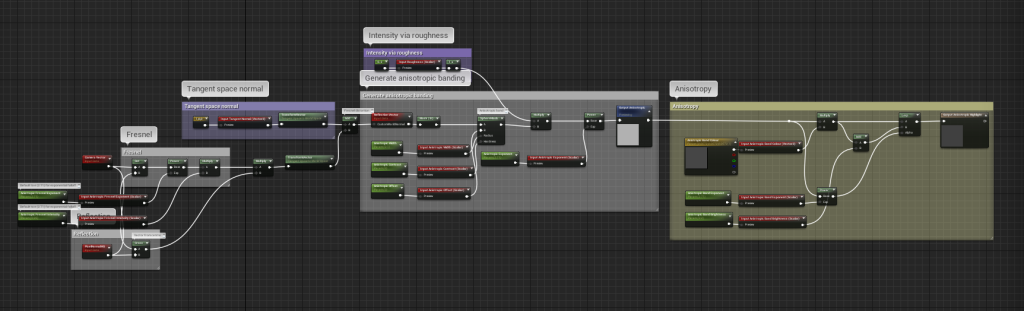
While this is only a subtle effect and does not affect the actual specularity (though is still driven by roughness), it does open up more material options and allows me to add extra complexity to existing materials.
Where Now?
From here I will be developing a polish list and working through that – adjustments that need to be made currently are ones such as adjusting albedo values to be more physically accurate. Also I will be finishing up a desk prop to replace the prototype desk (first prop made in the project) as the style now falls too far beyond the rest to be consistent.
I will also be further developing the shaders – such as the water shader to potentially add procedural waves purely in the shader. But apart from that it’s just polish from here on out to the art & finishing up the level.
Week 9 – Props & UI Design
This week has been solely focused around asset creation, namely for exterior props. I also worked on some foliage, rocks etc. The other focus has been on the UI side of things in which I have been getting the usability of the demo up to speed and removing debug UI – this is now complete and features a fully modular scripted system for attribute bars (health, mana, breath when underwater), and ability slots (including the pistol) – which is used on the HUD, weapon wheel, and to show how many health/mana vials the player currently has.
You can view the Artstation post of the assets I worked on here – https://www.artstation.com/artwork/3XQy2
Props & Misc Assets
There isn’t much to say on the props side of things other than I have developed a load of props to fill out the space. I did however investigate into Marvellous Designer further (as this is a software where my knowledge is lacking) in order to simulate cloth for the covered furniture and small rag.
I also created some procedural foliage using Substance Designer and combined them into an atlas using the Atlas Maker node from Substance Share. – https://share.allegorithmic.com/libraries/18


I did also create some leaves but I’m not happy with how they turned out so I’ll be using ZBrush to generate the alpha and normal maps for those and then procedurally texturing them via Substance Designer.
UI Design
By keeping my scripting design modular and in an object-orientated approach I managed to cut down the workload significantly as I identified within the original UI of Dishonored 2 what data and functionality is shared across different but similar UI elements. I then used this in tandem with the modular ability system to store data about each ability (name, description etc) which is then populated on the weapon wheel procedurally, meaning the system relies solely on creating and adding a new blueprint to the player to add an ability (or equipment such as the pistol as that lies within the same system).
The slots themselves are objects (or more specifically widgets) which are then populated at the start around the weapon wheel using some basic vector math to rotate the position around the wheel based on how many abilities the player has.
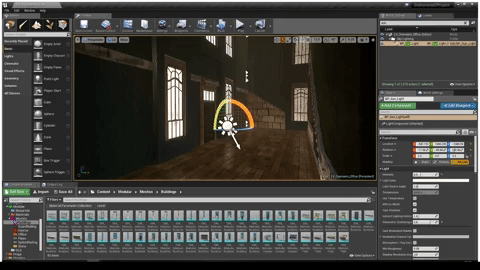
Lamppost System
While creating the lampposts I also created a system to connect them in a network which will then generate wires between set points. The gravity of each wire can also be adjusted, and it will droop down more the further the two lampposts are.
Where Now?
From here I need to implement the VFX for the last ability (the dark ability), and wrap up the level design. I will also most likely continue to polish up areas in terms of design and environment art while I write my dissertation.
Week 7 & 8 – FPS Rig Revamp & Enemy AI
The last 2 weeks I have rolled into a single blog post as a lot of the work hasn’t been interesting enough to write about for a single week. The main focus though has been on implementing enemy AI systems and polishing up gameplay, where a lot of animation has naturally come along as I link the 2 together.
Art Production
The beginning of week 7 started with me first reworking and refining my asset production pipeline from a production standpoint, where I have introduced a new slot into my spreadsheet connected to Google drive to allow me to link to images also stored in my Google drive, and I can also comment on sections of these images. While this sounds simple, this has improved productively massively as I don’t lose sight of what I’m setting out to produce and have constant reference which is easy to refer back to as I work my way through the list.
For this project as it is based on an existing IP with an established art style it does refer back to screenshots I have took from in-game, though in a production environment on a new IP this could easily refer back to real world reference images.
Assets
To start with I produced these 2 procedural materials as I felt I needed more variation in the flooring.
I also introduced more variation into the interiors by adding in door grates and a new archway section which introduces more opportunities for varying up the flooring on the same level.
I also produced some “clutter” props early in week 7 using the same standard 3ds Max > Substance Painter pipeline, though in this case I also utilised ZBrush for extra sculpted detail on the woods, bricks, and some on the box. The texturing workflow was approached procedurally (i.e. I created a cardboard generator to add damage to the cardboard box by painting in a mask).
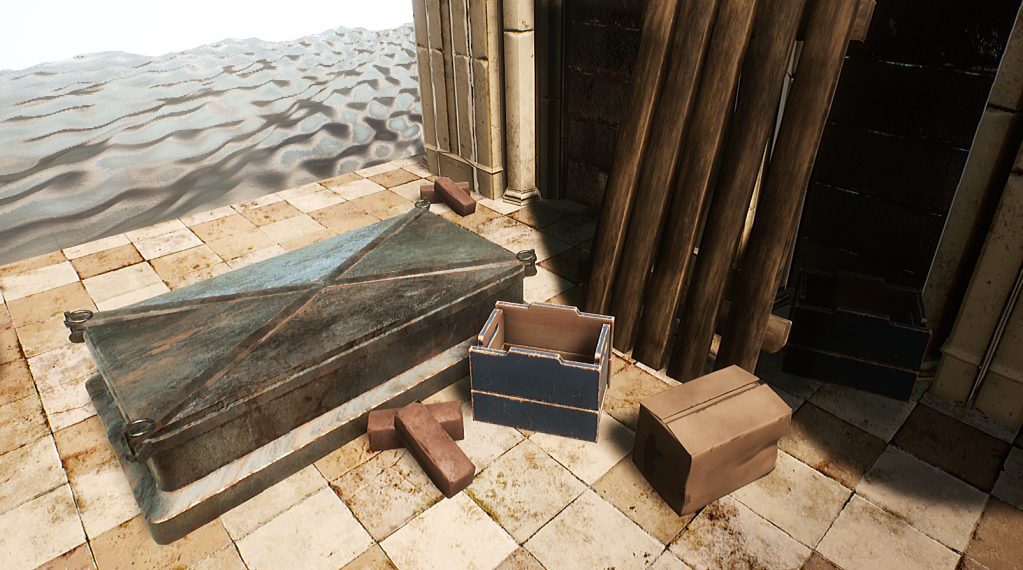
As explained in my last blog post I re-use a lot of texture space and focus on creating re-usable components to then build my final prop meshes. This helps to save on texture space and reduces the work load as for example you’ll never be able to see both sides of a crate at the same time, and in the case of placing them next to each other for their scale in the world the difference is negligible.
I also utilise face weighted normals on my very blocky meshes which have bevelled edges, such as the bricks and planks. This simply weights the normals based on the average of surrounding faces based on the angle of said faces – this helps to correct incorrect shading caused by normals all facing out from their face normal.
I also generated used the roof tiles material I made last week to generate these new roof pieces to add extra variation to the environment. The second shot utilises a material instance of those for darker tiles. This also helps fit the environment closer in with the Venice/Italian architectural theme.
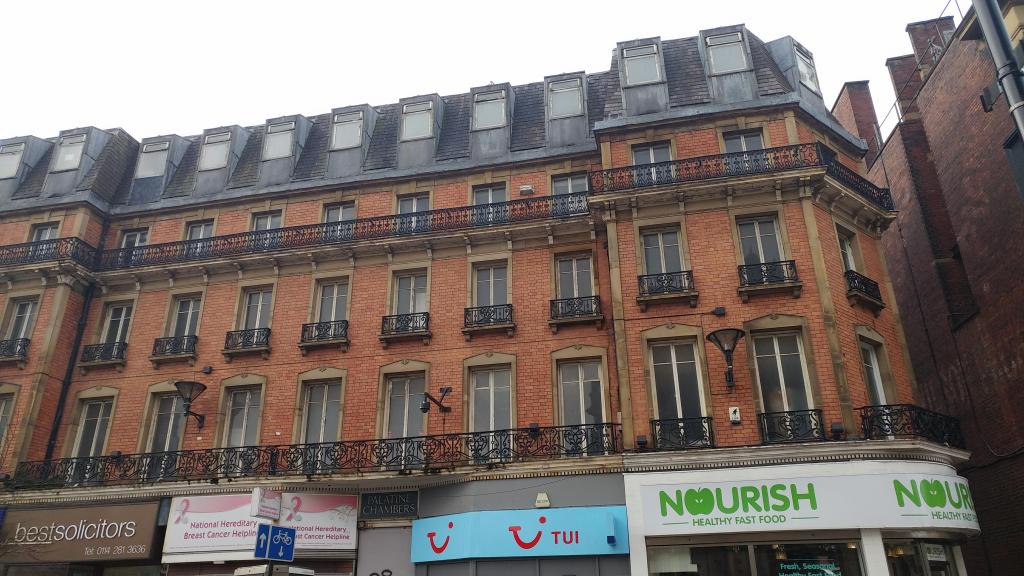
I feel it’s also worth noting that I based the roof tiles for the second shot from a photo I took in Sheffield which is a good place with a lot of varied architecture, with some of that being really close to the architecture I’m referencing from.
FPS Rig Revamp & Animation
I revamped (again) the FPS rig to bring it up to quality from the prototype rig I built. This was a risky move as I had to recreate all the animations to match, but was something I realised would save me time while I was revamping the model and saw a lot of issues with the rig. This time round I opted to use Biped in 3ds Max for the arms (from the clavicles downwards) with a mixture of helpers and custom bones to control stuff like the pistol, blade, and camera.
The benefit of this new rig over the old one which used bones and IK handles is that IK/FK blending is already set up for me and has a system already in-built to copy/paste poses, which is extremely useful when working with the hands. Also something I noticed when vigorously re-animating all the clips is that a lot can be faked in first person as long as it looks and feels good.
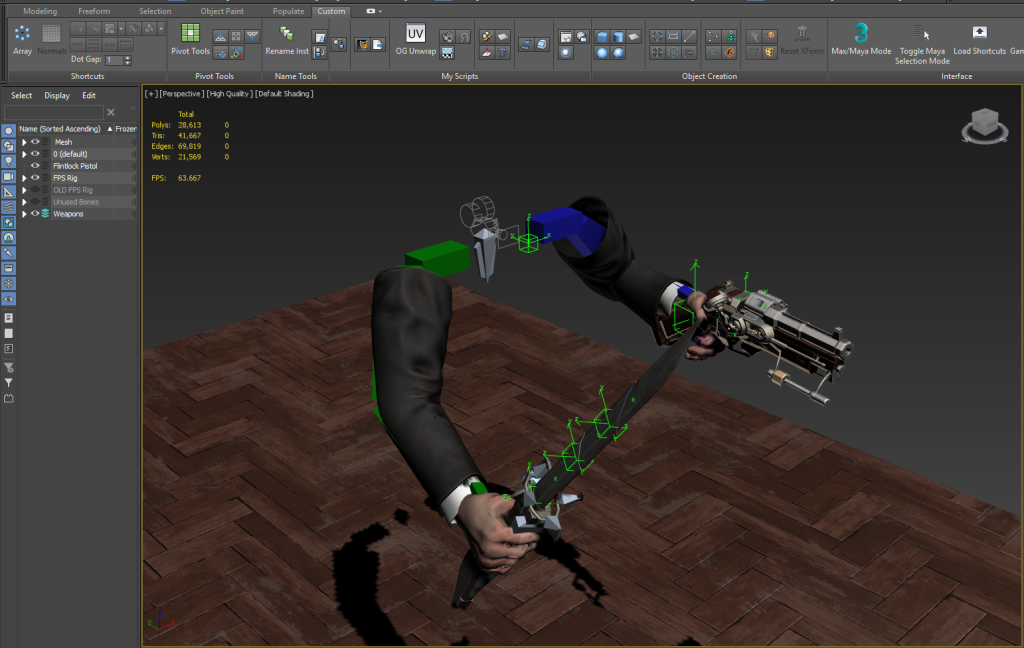
I keyframed this animation with the FPS and guard rig in the same file so I could link them up. This was my first time animating with multiple rigs interacting so closely, and was difficult to transfer to UE4. In the end I implemented a system which zeros the camera smoothly, and allows me to move the player to a pre-defined spot smoothly. This happens at the start of the montage being triggered for both the player and the enemy so that they link up in time for the important parts of the animation to play – the only catch is placing the root of the player in the correct place to animate, removing root motion from the animation clip, and linking that value into triggering the montage which doesn’t always match the animations up perfectly (possibly due to the capsule collider of the player) – though this is something I will refine if I decide to create more animations like this.
VFX and sound is then linked up in UE4’s (very nice) animation clip editor.
AI Scripting
To start with I investigated behaviour trees but then quickly realised that using this system would only benefit me in a much larger more complex project with different AI patterns, whereas my project only contains the basic guard AI as the power complex is the focus gameplay-wise so most the time the player will just be avoiding the guards, or engaging in combat which ends as quick as it starts.
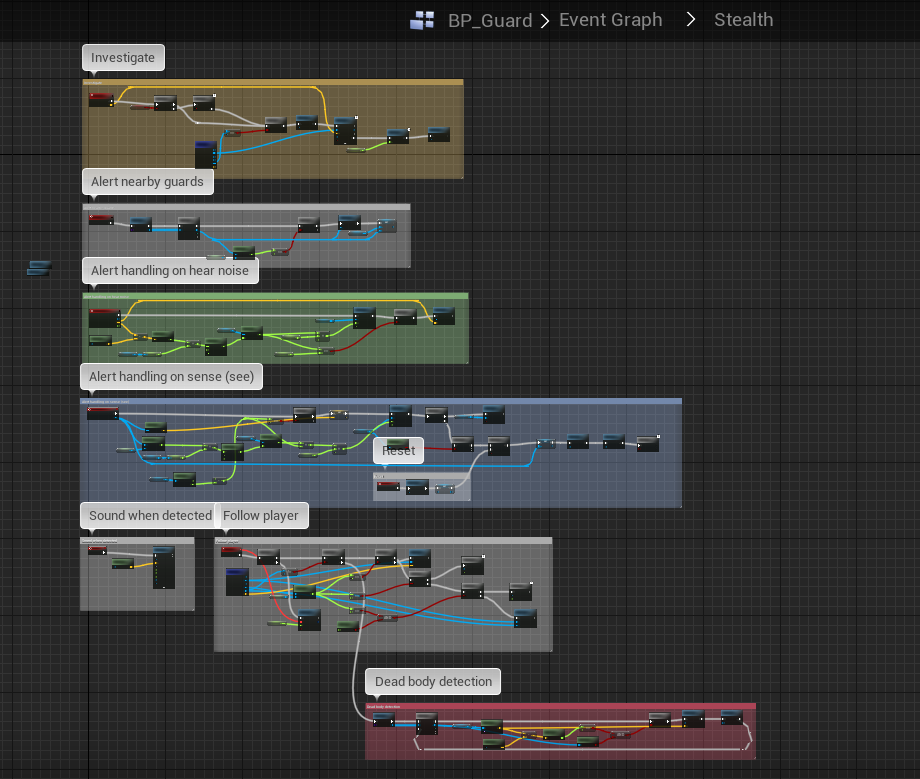
So I simply used Blueprint scripting to set this up with custom events and sub-systems for triggering animations which disable movement while they occur. I also have a coroutine which runs every 0.25 seconds to handle patrolling and attacking the player.
This stealth graph handles the majority of the logic behind the stealth and combat systems. And while this isn’t maintainable in a larger project it fits the needs, and the general rule of thumb for AI is that it should only be as smart as it needs to be (i.e. Goombas in Mario only need to move side to side).
The attribute component which is used for health & mana handling was also used here to handle the alert metre which defines the points at which the AI switches from passive to aggressive, and already has the internal logic for refilling after x seconds which helped to abstract the behaviour here.
The behaviour is simplified into idle/patrolling, and when the AI becomes alerted it will actively search out the last spot where something was spotted or a sound was heard (depending on which came last). If the player is in view they will actively try to follow the player, attack if in range, or shoot if at a distance with an element of chance.
Shadow Volumes
Stealth is determined by a concealment value on the player which is altered based on different conditions, and then used to scale noises made by the player (picked up by the AI’s pawn sensing component) and sight. If below a range there is no effect, so crouching in a dark space will make it very hard for the guards to spot you.
As usual for easy tweaking the scale at which these things occur based on their distance is scaled using curve assets so I can control the falloff very specifically and fine tune these.
The main thing that affects the player however apart from crouching, is their visibility. To do this I use triggers with their own concealment bonuses applied – when sampling the player’s concealment value it will grab the maximum concealment value of the trigger overlapping with the player. I do this as literally sampling how visible the player is, is an extremely difficult and unnecessary task with too many variables involved, and this also gives me control over the gameplay so I can lower visibility on vantage points.
For editor purposes these boxes will become more red the more they conceal the player, though this is hidden in-game and from light rendering.
Blink VFX Revamp
To match the VFX of the blink concept which utilises rats and smoke instead of the energy appearance I revamped this from the VFX side of things, though it functions the same.
The rats just use particle meshes so they can’t be animated (at least not skeletal animation), but for the sake of this VFX I think it works nicely. I may animate the rats further down the line for the environment and crawling up the player’s arm if I have time, though I feel as though cutting the rats from crawling up the player’s arm makes the power more responsive as the animation could potentially draw it out too much.
Where Now?
From here I will be further refining gameplay as I go, but the biggest focus is now on further expanding and refining the level design & environment art. As stated previously I need more exterior assets such as clutter, rubble, and foliage. I have already planned out these assets in terms of priority in the revamp of the asset list – though these were pushed back to get the game playable which is vital to the level design as I needed to know what I have to work with first.
I also still need to implement the VFX on the last power (the dark ability), though this should be fairly simple. And as a stretch more UI work to allow the player to see what they have selected (and for the pistol how much ammo they have) would be nice, as well as switching weapons. And as an further stretch a quick main menu to come back to after dying for the sake of demoing would be preferable to have, as well as more stealth kill animations.
Next week I’ll be focusing on level design & foliage as top priority however – but the end is in sight!
Week 6 – Interiors, Lighting, & Props Workflow
This week’s focus has been very heavily geared around creating interiors, more material work, and figuring out a lighting workflow which allows for a high standard of lighting with an optimal frame rate and frame pacing (revised lighting workflow took FPS from 30-40 average to 70-80 FPS).
I also revised the FPS hands model to fit with the narrative and to bring it up to quality, as well as finish off the rats ready to use in the Blink VFX (as per the concepts).
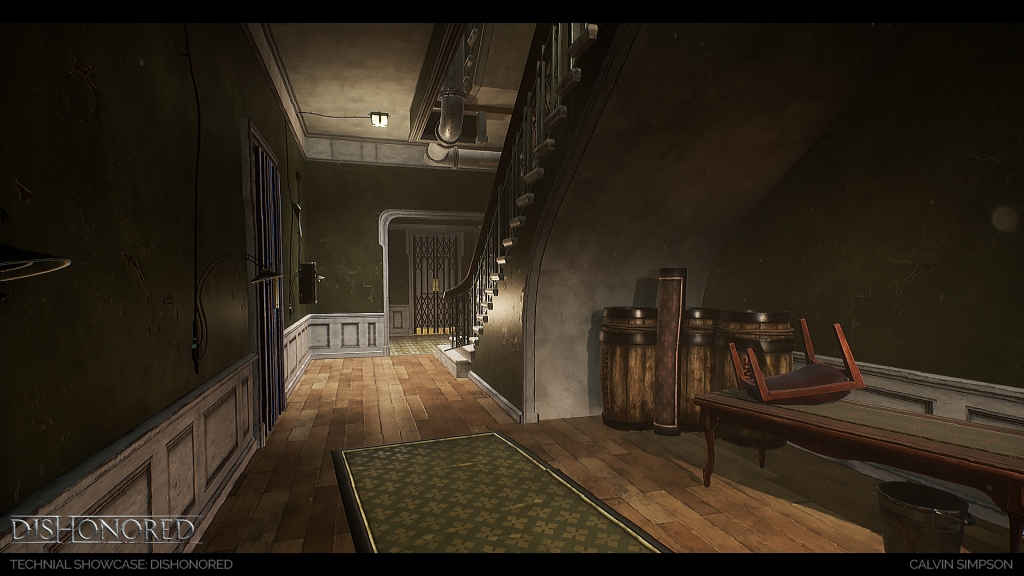
Interiors
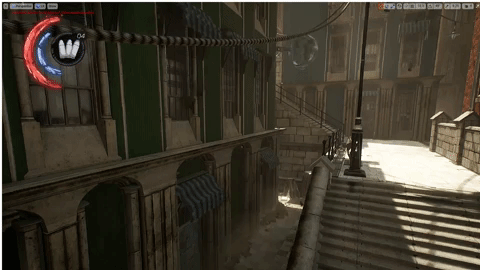
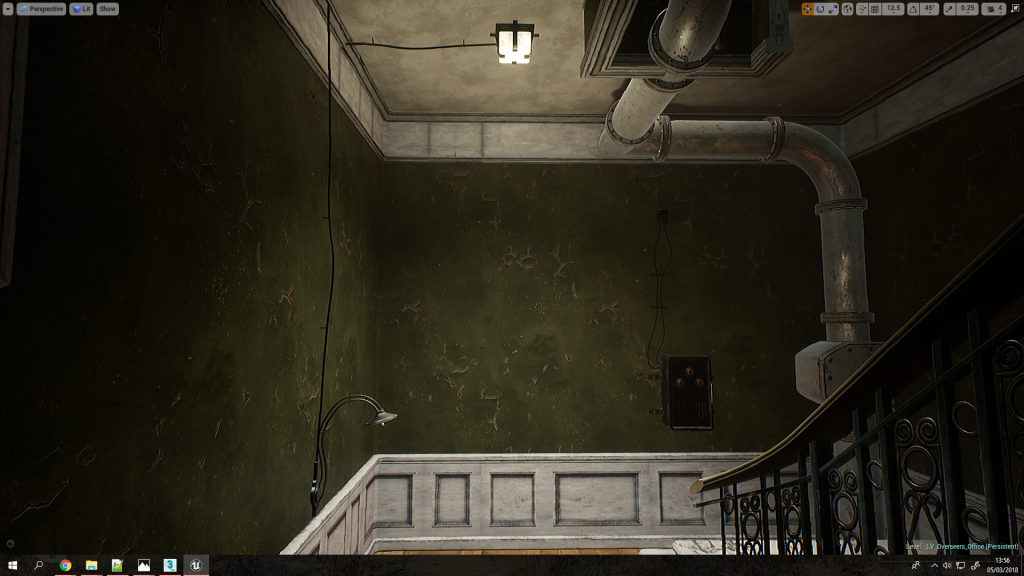
This week’s main focus has been on interior environment art in order to help flesh out the space in the levels. I want the level to feel expansive and a part of a real world, so interiors help me to do this, tell more of a story, and also provide more opportunities and routes through the level for the player.
In this example the player can climb through a window and use the stairs to gain access to the 2nd floor where they will encounter a torn up room with some environmental narrative and some pickups. They can then progress by climbing through the window to climb along the pipe system outside which provides a vantage point as a reward for exploring the level.
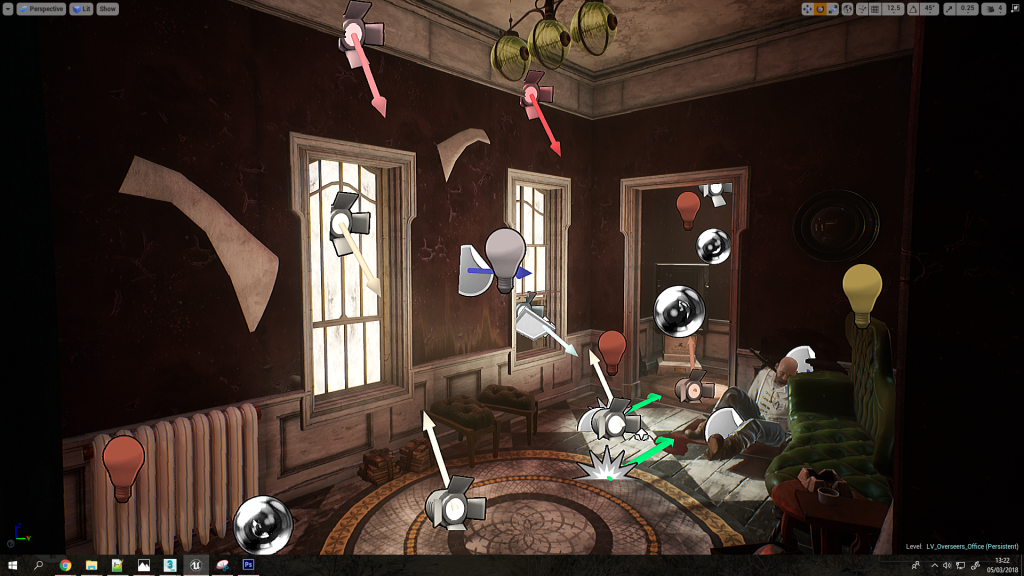
To create these interiors the new interior pieces had to use a standard size of 400cm in height, whereas the previous interior pieces (wallpapered wall kit from the prototype) uses 275cm, and the building pieces were 300cm in height (originally intended to provide 25cm of floor/ceiling space height). I have now overhauled the building pieces to use 400cm as the standard height, and using the building tiler system the transition has been easier. The Overseer’s office interior from the prototype had to be tweaked but remains in-tact and still utilises the 275cm height without any issues though this may change down the line.
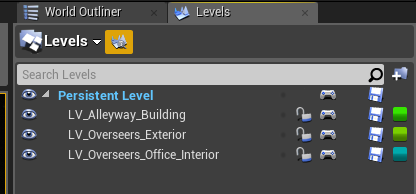
During the transition process I also started to separate areas into their own levels which utilise level streaming to be loaded in, whether I use this as just an organisation tool or something to actually optimise the whole level is something to look into down the line.
Revised Lighting Workflow
static/dynamic/stationary, shadows, fps (hitting 70-80fps)
I decided to revisit lighting as throughout my years of experience with building games the main killer of performance I have noticed is lighting and shadows. So I investigated heavily into how to actually utilise UE4’s lighting system which allows for a mix of static lightmapping, reflection mapping, shadow mapping, dynamic shadows, and dynamic lighting.
I found that the basic run down of the 3 lighting modes are:
- Static – diffuse contribution only (no specular contribution) but extremely cheap as it’s all baked into lightmaps
- Stationary – diffuse AND specular contribution, partial lightmaps, dynamic shadows, static shadows, can change intensity/colour at run-time (mix of static and dynamic essentially), can utilise IES textures and light functions
- Dynamic – can do everything stationary can but all lighting is dynamic, useful for dynamic global illumination (controlled through post processing)
If you want to read up in much more detail you can find where I found the majority of my research here – https://forums.unrealengine.com/development-discussion/content-creation/3076-static-or-stationary
Exterior Lighting
So with all that in mind I decided to utilise dynamic lighting in the exterior as this was the easiest and an exterior level is far too large in scale to utilise lightmapping where this could actually hurt performance, and only requires 2-3 light sources as dynamic, and some strategically placed bounce/fill lights for specific focal points.
My exterior lighting consists of atmospheric and exponential height fog in combination with a sky sphere – this creates the atmosphere and fogs out at a distance, while also allowing me to utilise volumetric fog/lighting (voxel lighting).

Interior Lighting
Lighting for interiors requires more intervention however with much more precise use of bounce lighting, fill lights, and reflection captures. I would normally use a lot more lights for interiors but that is a much more brute force approach which would only work with static lighting (which sadly doesn’t contribute to specular reflections, making lighting fall very flat).
So to revise my interior lighting workflow I very strategically place lights, starting from light sources and focal points first – usually with spot lights which I default to not using inverse squared (physically accurate lighting) as I am trying to fake in lighting (I will use inverse squared for physical light sources). And I also place reflection captures along the space (with a revised radius), and I will place more in areas with reflections need to more accurate (usually with metals/surfaces with very low roughness/high specular).
By default I also use stationary lighting and turn shadows off as this is the biggest performance killer – I will only use shadows in strategic areas such as from windows, and physical light sources (though these I will usually opt to use dynamic lights). If I do enable shadows I will almost always disable dynamic shadows unless I want to create a specific type of atmosphere or I know very specific gameplay will happen in that area. With my spot lights I also make good use of temperature, colour, intensity, inner/outer cone angles, falloff exponent, and min roughness.
For areas which transition from exterior to interior (or vise versa) I use light portals to help leak that sky lighting, as well as bounce cards (a spot light bouncing off a very light grey plane) outside – this helps to create soft shadows and lighting which feel more natural. And the bounce card technique is the same idea as pointing a light at a white sheet to fill out the space in photography shoots.
Technical details aside I will put in these focal light points, then follow the lighting round with bounce lights, usually adjusting colour to create mood and atmosphere, while also faking in and exaggerating global illumination as lighting will retain some energy (colour) from the surface it bounces from – so if a light hits a green wall it will carry that green as it bounces. I also use point lights to fill out dark spots, lift detail, and generate ambient lighting – these can use static lighting, or stationary with no shadows and adjustments to min roughness as they are not actual light sources so I don’t want them to be captured in reflections.
Materials
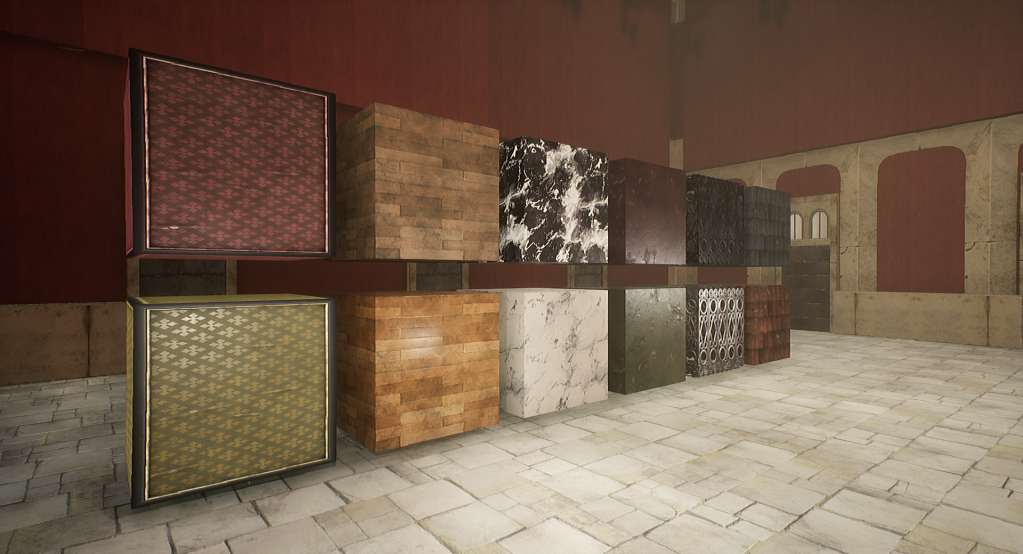
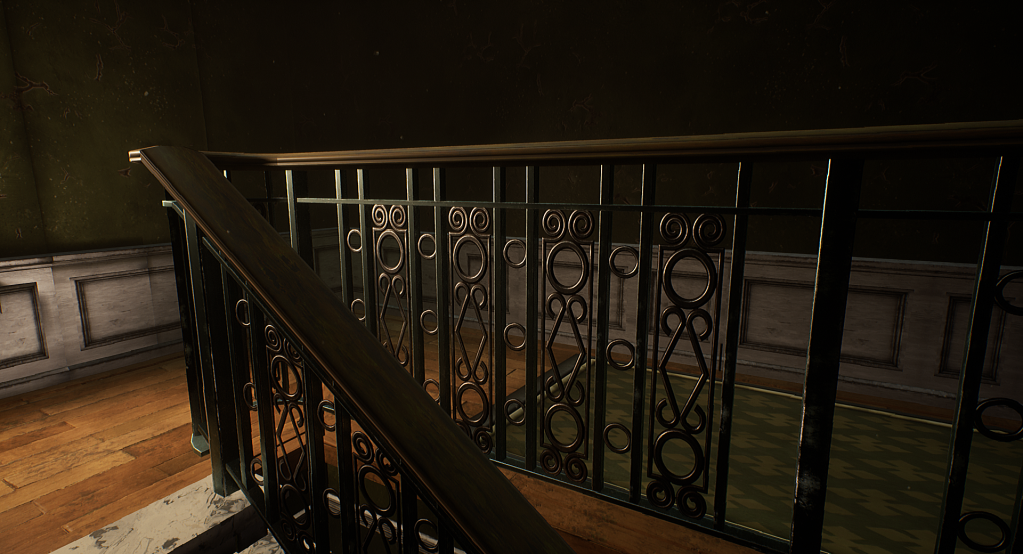
To achieve this I first focused on materials with a heavy emphasis on the Substance Designer to 3ds Max workflow I have been using throughout the project. I created new materials for wooden floorboards, a rug, an alpha cutout decorative trim (it would cost too much in geo to use the regular metal trim for those details), a rugged wall, and tiling marble (for the staircases). These materials can and most likely be re-used across many interiors and in other areas, as has the previous materials been re-used here.
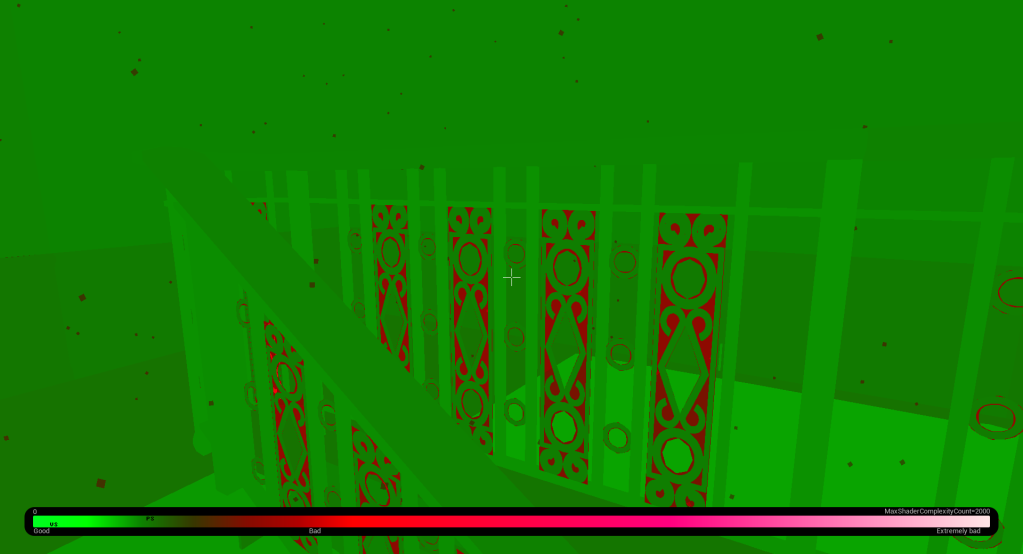
I’m extremely heavy on procedural workflows wherever possible, so to create the decorative metal trim I utilised 3ds Max in a procedural way where I purely used splines, the loft modifier (to extrude closed shapes along splines), the symmetry modifier (to create the patterns), and double smooth tessellation (turbosmooth with Catmull-Clark tessellation by smooth groups, then again normally to polish edges). This allowed me to purely control the pattern by manipulating the symmetry modifier and editing splines (seen to the left).
This was then baked to a flat plane, tiled and textured using Substance Designer, and in 3ds Max applied to a plane using masked opacity blending, where I also cut out large areas of unused space to reduce overdraw. This is because with masked opacity overdraw only occurs in un-used space where the currently rendered fragment is thrown away if the opacity falls below a threshold – but the small overhead vastly reduces geometry complexity which would also cause issues with light maps due to how complex the geometry would have to be despite its small scale.


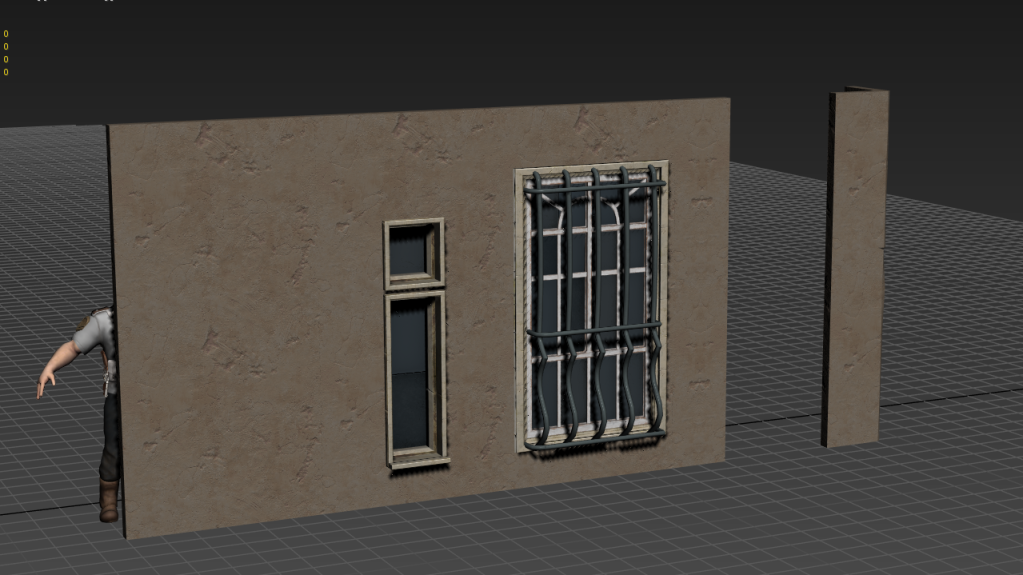
Window Shader – Directional Lit Translucency
I feel it’s worth mentioning that while creating the interiors I needed to find a way to help direct the player through them, as the lighting contrast to the exterior is massive so it can be easy for the player to get lost. This is also especially true as transparency isn’t an option as it will cause too many problems, so my solution was to integrate directional lit translucency to the backface lighting of interiors.
This works as all windows are only planes which ignore the winding order which would otherwise cull their backfaces, I can however in the shader determine what side of the face is being rendered to the current fragment (pixel), so I can use that to blend in the lighting contribution (added to emissive) which is calculated using the standard equation for lit translucency which is essentially lambertian diffusion except it passes through the object so the normal is flipped.
Light = -N.L or more simply put Light = Dot(Inverted Normal, Light)
The basic run down is that this means windows when viewed from the interior will emit light if the directional sun light passes through it, otherwise if it’s shadow the contribution is much smaller. The actual direction of the sun light is passed through a uniform variable (collection parameter) which is calculated from the forward vector (X) of a blueprint which extends the directional light class.
Props Workflow
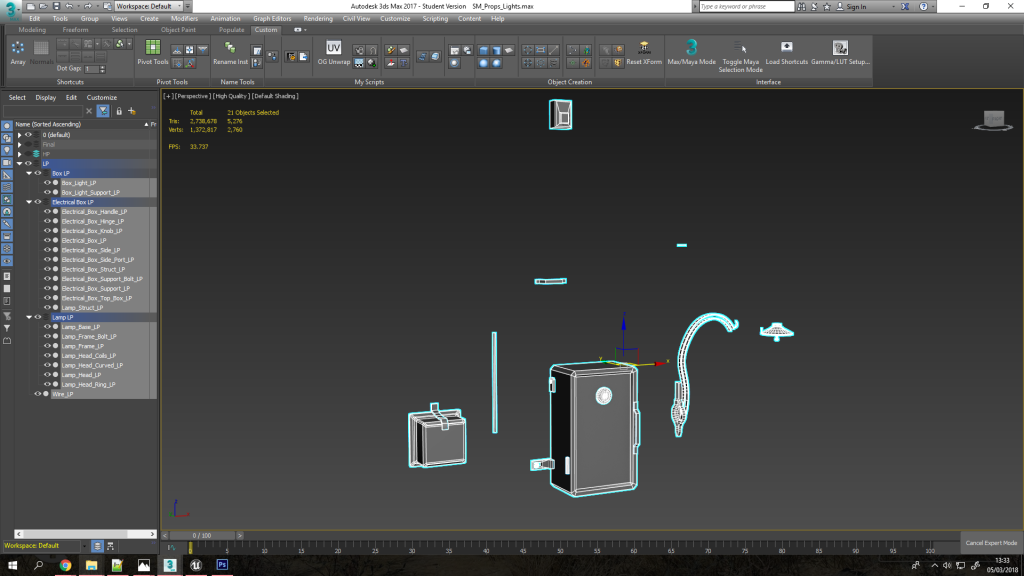
I had to create some unique props for the interior as I needed to actually provide light sources to help me with the lighting. So I created these 3 props – a box light, a wall lamp, and an electrical box. They all use the same material to save texture memory, draw calls, and just generally reduce the texture count (helps with organisation).
My workflow for actually producing these props starts with the high poly generated from the low poly using the double smooth modelling workflow, which involves using one turbosmooth by smoothing groups and multiple iterations to tighten up the surfaces, then another turbosmooth to polish edges. This allows me to be much more free with my concepting and idea stage as I don’t have to worry too much about having to generate the same meshes with different topology and using nearly as many support loops.
I also use splines a lot to help generate the wires, lamp frame, and lamp head, as well as symmetry modifiers, and instanced geometry which allows me to work on a planar work environment while seeing the changes applied in real time to the piece with the correct orientation and position on the prop itself. I also keep in mind repetition, patterns etc for my low poly down the line (such as the wire for example).
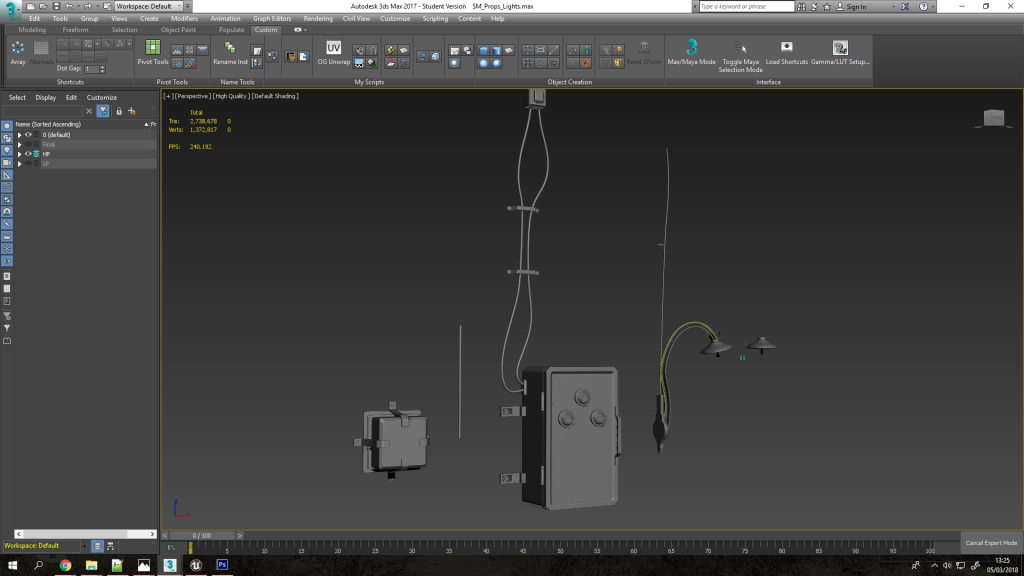
Generating the low poly is as easy as duplicating the prop pieces, removing what I don’t need to save texture space (this will be repeated back later), adding support loops/geo for the bakes (especially on cylinders), and creating one tiling piece of wire (the UVs will range from 0 to 1 in V so I can tile that one section, and the U seam will be hidden).
I also use smoothing groups as opposed to chamfers for the most part as this makes unwrapping easier as the geo is simpler, and provides a better bake (the bevels will be captured regardless). When I unwrap I usually use unwrap by smoothing groups, or for more complex pieces I use my custom script which breaks edges by smoothing groups – this whole process is much quicker using all the custom scripts I’ve written as seen on my custom ribbon.
I then export both the low and high as a single FBX for each with tangents & binormals (incorrectly named, should be named to bitangents but oh well!), and smoothing groups. These are then baked by mesh name (important for avoiding intersecting bakes), once the bake is fine and finalised with no UV errors then I begin layering on base materials I’ve amassed in my library (usually consisting of base with baked lighting > overlays > roughness > fine detail > dirt > sharpen).
I fine tune the materials and paint in any specific details after that, where I try to stick to being as procedural for as long as possible so I can fine tune the lookdev with ease. This is done by using lots of generators, fill maps, grunge maps, noise maps, mask building, filters etc.
I also use the baked lighting filter for my base material – though I even out all the directional lighting contributions so it’s extremely subtle, and then adjust AO/cavity & edges so that it makes the asset pop a bit more while remaining physically accurate (as per the Dishonored 2 style).
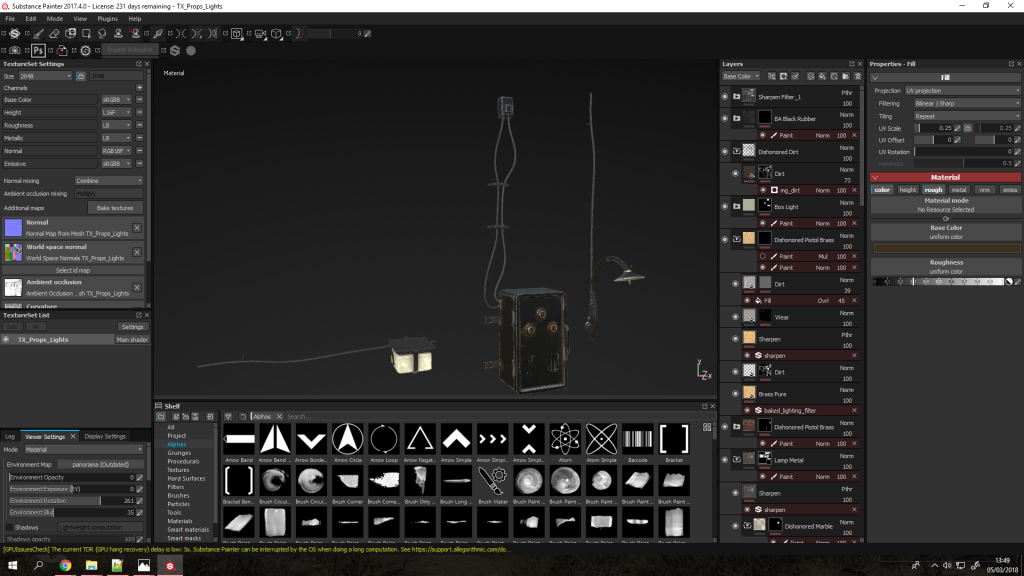
The textures are then exported using a custom export preset which packs the metalness, roughness, and ambient occlusion into one texture, and ensures all naming conventions are correct by using the material name (set in 3ds Max, for example TX_Props_Lights will give me a normal map named TX_Props_Lights_N). And with these textures applied (so I can see the ambient occlusion namely) I duplicate the low poly meshes again, remove support loops/geo/tessellation, and set up the symmetry modifiers and instanced geometry again then combine each prop into one mesh, name it, ensure the pivot is placed sensibly and the prop has a sensible orientation, then batch export which gives me an FBX using the mesh’s name.
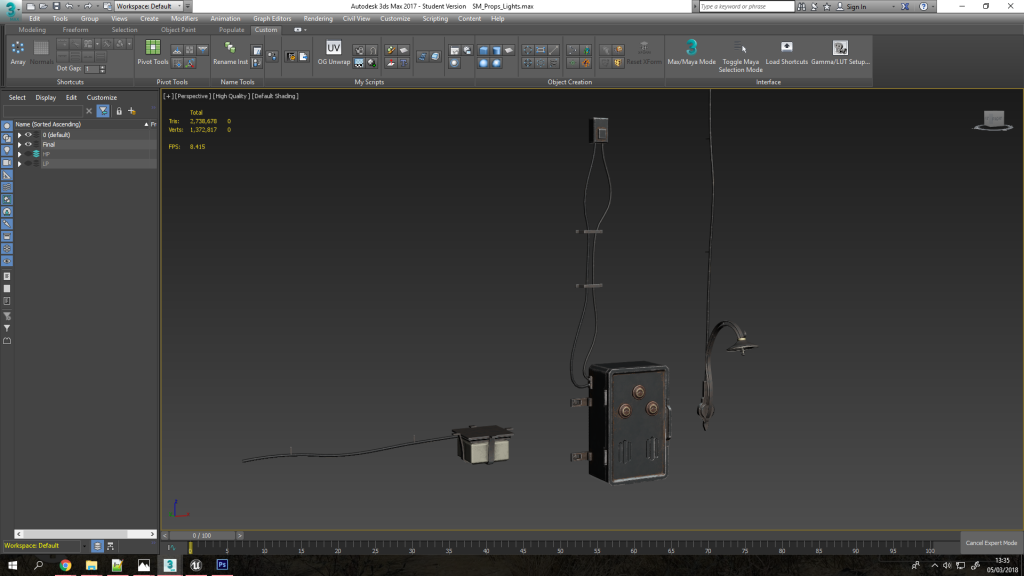
These props are then imported into UE4, materials set-up, collisions set-up (I used a series of box colliders for the wall lamp), and placed in the world.
When placed in the interiors I feel these really help sell the feeling that world is connected, along with pipe systems etc leading up through the walls. This to me is vital as the player will be experiencing these environments and exploring them, not just looking at images of them where I can choose what they can or can’t see.
Revised FPS Hands
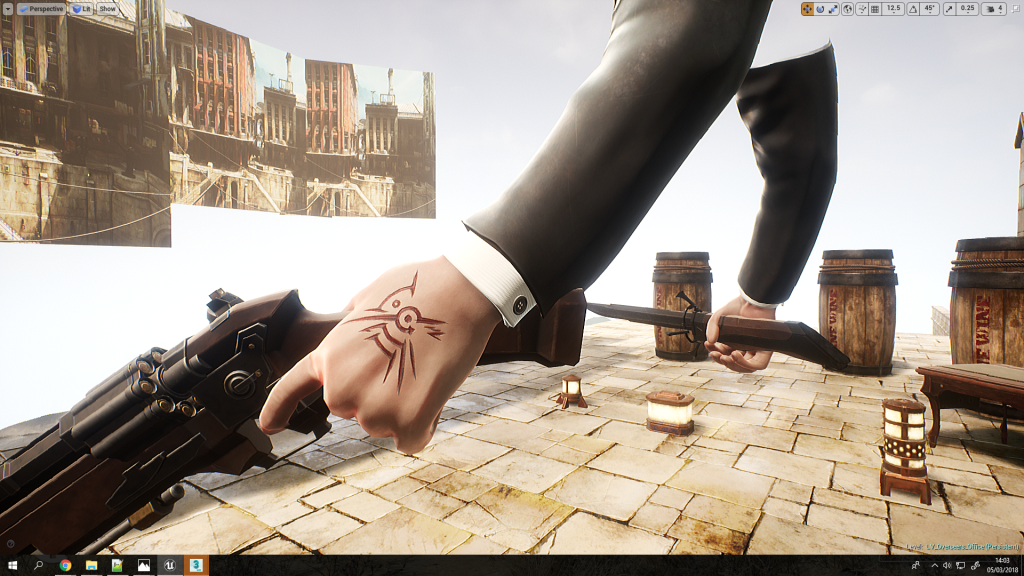
I also revised the first person arms as I felt the old model from the prototype was lacking in quality and polish, and the hand model also felt very off. So I refined the sculpt and simplified the model to match the character choice I chose earlier in pre-production (The Outsider) – opting for a more simple design of just simple sleeves and cuffs with a button, and more stylised and slightly larger hands.
")
")
I also incorporated some more narrative by changing the outsider’s tattoo into a red scarred version cut into the back of his hand. I made this choice as the Outsider doesn’t bare his own mark as he is the one who grants it as a gift to others in the storyline, so to stay true to this and the *spoilers* ending of Death of the Outsider in which he is freed (canonically returned to his mortal form), I felt it was fitting he would try to access the power of the void where he was trapped through very crude means. The tattoo also now glows red as a result of this as I wanted the powers to feel much more raw and less tame.
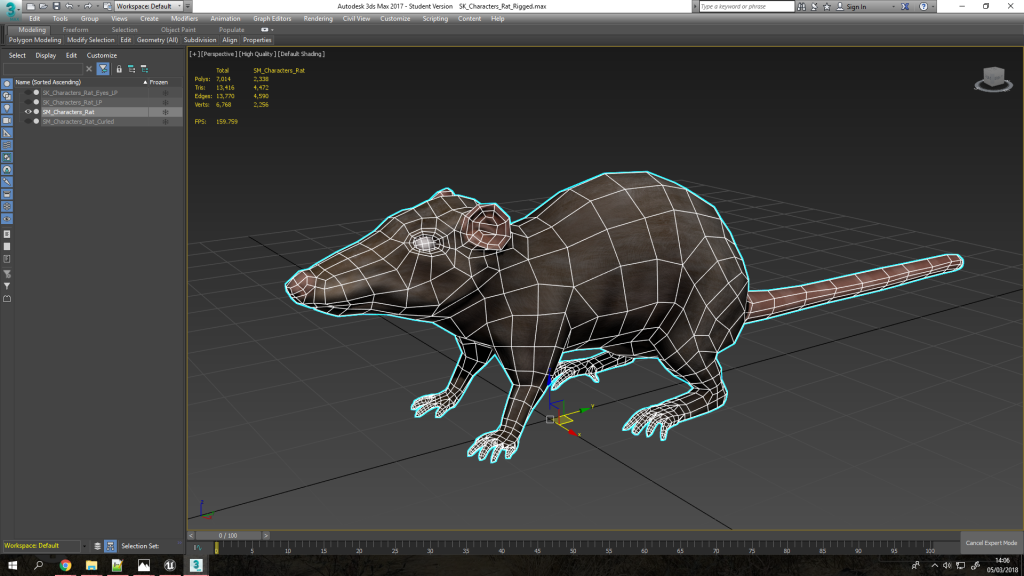
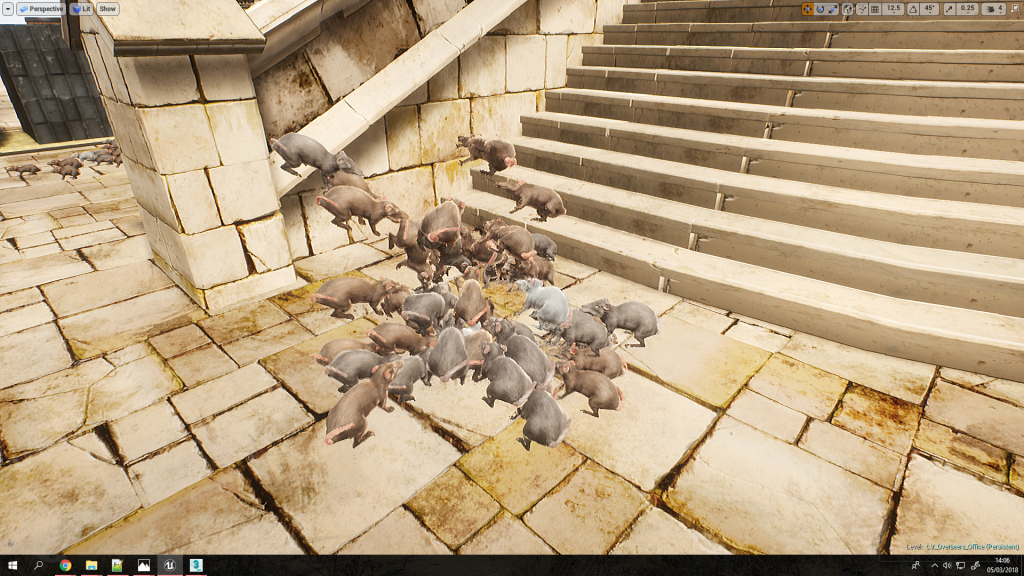
Rats
I also completed the rat model which was modelled in ZBrush using dynamesh and ZSpheres first, then retopologised using the freeform tools in 3ds Max. I kept the topology very low as there will be many on-screen at once using particles, but also optimised for animation as I will be rigging them for specific animations (such as climbing along the player’s hand during Blink), and potentially for scuttling around in the world.
Where now?
This week I will be focusing on polishing up my progress report for the deadline, along with creating environment assets aimed at the exterior portions of the level, along with further expanding the level per the level design top down plan (namely the docks and shop/courtyard area). I will also work on VFX for the Blink ability, and if I have time I’ll start designing and implementing in the guard’s AI & stealth system – if not I will be working on that next week alongside animations to accompany the guard’s various states & combat.
Week 5 – Abilities Implementation & Level Design
This week’s focus has been purely engine focused with a lot of back-end groundwork for the ability system implemented and refined, improvements to existing mechanics for added “game-feel”, and a start on the level design.
Abilities – Scripting & VFX
This week I have been working heavily on implementing and refining the abilities, as well as more importantly their VFX (post-processing, shaders, and particle effects). I have also refined the groundwork to provide me with more control when scripting the abilities (something that is constantly being refined).
I am using a component based design paradigm when it comes to scripting these abilities, where each ability is its own blueprint actor (object) which inherits from the base class (BP_Ability_Base) which includes all the base functionality and virtual functions which I can override, but are handled by the base class as all the abilities and equipment follow a consistent control standard (i.e. tap/hold controls etc) – this essentially makes me base class an abstract class as this itself will never be implemented.

Following the component & object orientated paradigms I have added more systems to make it easier to script gameplay – this works well as Dishonored uses a systems based design paradigm in which gameplay is created by making the systems interact with each other.
For example I have created a system for creating explosions which is handled internally in its own actor, as well as a component which when added to anything compatible will apply fire damage over time and destroy itself when completed – this makes it easy to apply fire damage to anything by simply adding that component to the actor, as well as for these systems to interact with each other (i.e. explosions will apply fire damage to enemies within range).
For example this explosion blueprint is handled in this script here, and then neatly cleans up after itself by destroying itself which keeps the object orientated approach and makes sure the memory is freed after it has been used.
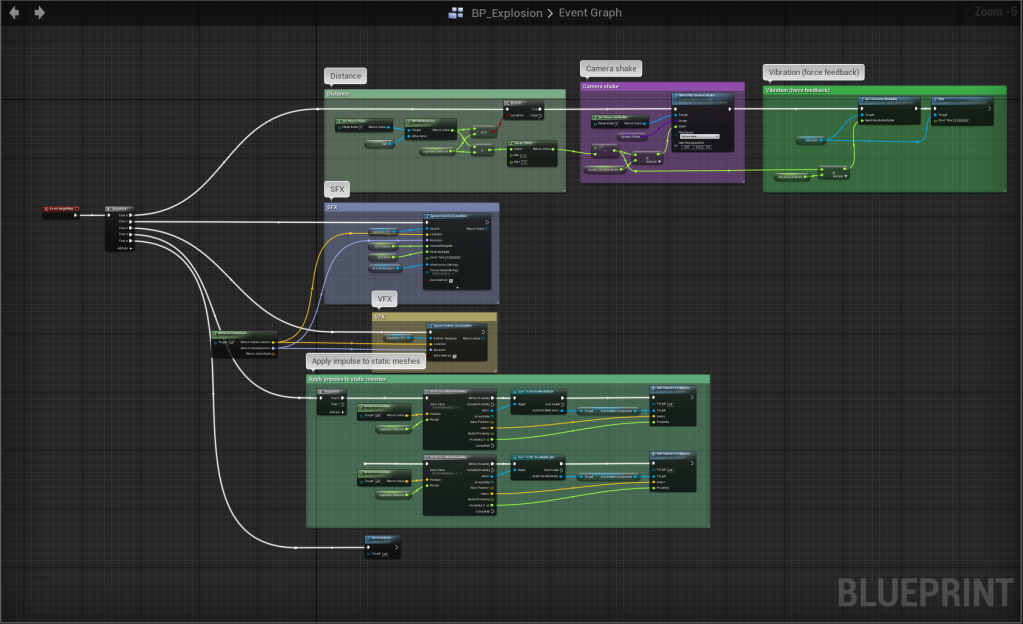
But this can be spawned easily using the SpawnActor function which also exposes all the variables I have selected to customise how the explosion visually and functionally. For example this is how the fire hold ability works which simply spawns an explosion at the player’s hand, but if I wanted to make a grenade I could use this exact same system without any changes other than to the inputs and where I’m spawning the explosion.

Level Design
Level design is a huge part of the Dishonored franchise, and while my project is not focused around this I do feel it’s still important to put the time into developing a well flowing level with multiple entry & exit points, different routes, and emergent gameplay opportunities. This is to best showcase the powers in a real-time game scenario and allow the player to just experience using them in a tested environment.
*Be aware that lighting hasn’t been baked in many areas and buildings haven’t been vertex painted or had proper decal passes as those are lost when tweaking – so when an area is finalised those will be dealt with.
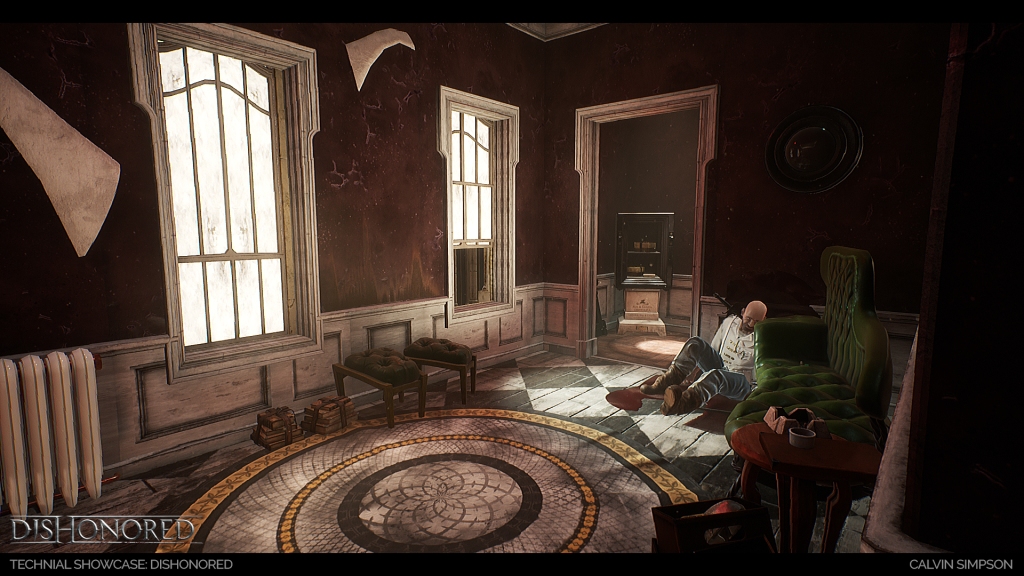
As mentioned previously having multiple entry/exit points is an important part, so as you can see here with the interior there are multiple points which the player can use to move between different points in the environment, or bypass entirely in this case! To provide incentives for the player to say explore the environment in this case I have provided 2 safes which will hold pickups for the player to help them progress (i.e. health vials).
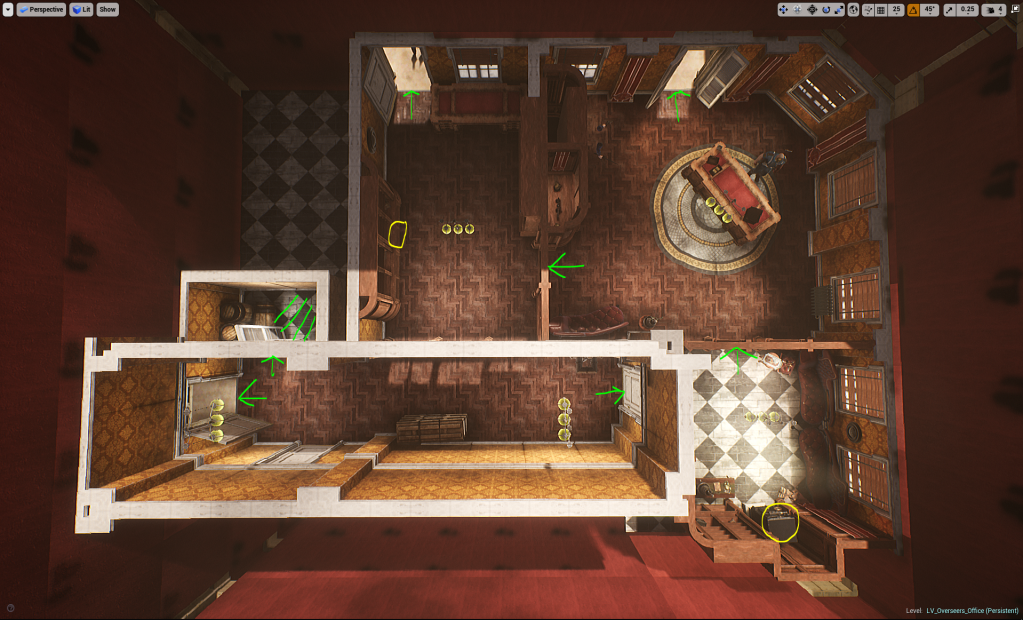
This interior is completely level however with no verticality – in this case I will most likely leave it as a single level to avoid too much complexity with the exterior transitions.
To combat this I created a back alley area which will allow the player to avoid combat by entering an interior environment through an open window, where I will then develop an interior with a staircase (on my to-do list in the upcoming week!) to provide access to the upper levels. In terms of level flow this will provide access to the vantage point of the pipes to either get a drop on some enemies which will be in the alley, or to bypass them and gain access to the overseer’s office (red building).
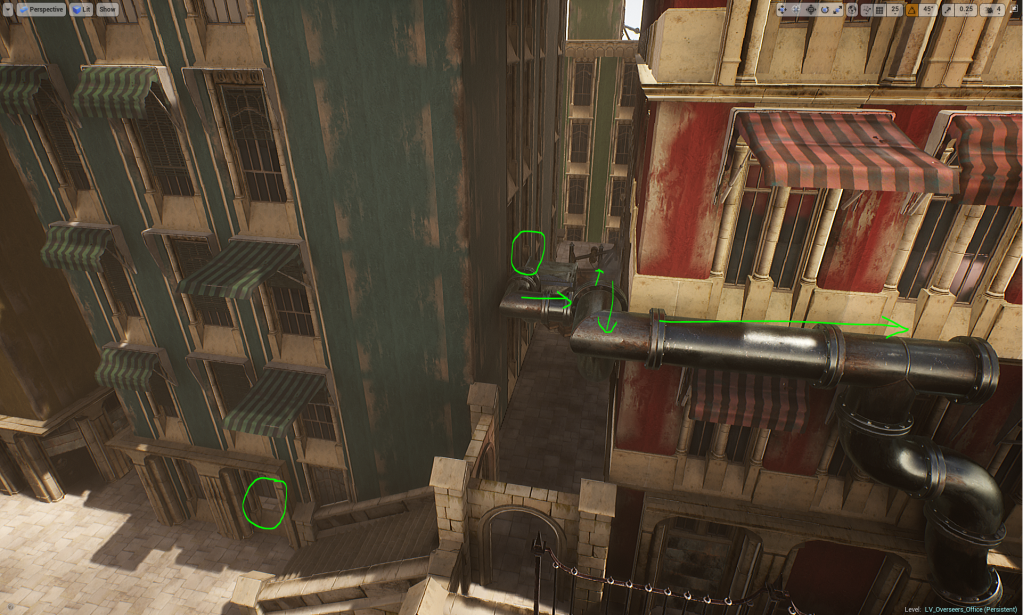
To provide small visual landmarks I have made sure all the buildings have different heights, shapes, colours, architectural styles, and even small unique details such as the roof exit point on the green building. This allows the player to navigate the environment with ease and return to earlier points without getting lost.
Where to go from here?
There is still a lot to go however and in order to further the environment I will be taking a small step back and just working through some more assets such as foliage (bushes, grass, trees, leaves), roof pieces (ceramic tiles, and roof pieces with windows), and interior pieces (staircases, floor material, wall material etc). This in order to give myself the most flexibility when designing the level further.
Week 4 – Gameplay Refinement & Level Groundwork
This week’s focus (alongisde writing my progress report & producing concept art) has been on building and polishing up the groundwork for the level design pipeline, where this means I have been refining and setting up blueprint actors to help speed up that process. Alongside that I have also been refining the mechanics and values so that the level design process is smoother and easier to test with a framework already laid down for the character controller.
Dynamic Crouching & Sliding
My previous approach to allowing the player to crouch under objects was to utilise volumes to adjust the capsule height to fit inside the volume – this however was very inefficient and temperamental. To replace this I have added a dynamic crouching system which checks for the height of the space in front (and at the player’s position if nothing is found to check if they are already underneath something) and then smoothly adjust the capsule height to match.
This works extremely well (and is limited by the capsule radius so the player can only crouch to a certain height) and goes hand-in-hand with the sliding system which makes the player crouch and pushes them along – meaning they can slide underneath obstacles without any hitches.
This section of script is being executed every frame to constantly find and interpolate between the previous crouch height to the target crouch height – this allows for smooth movement and for it to remain dynamic.
Inside the GetCrouchAdjustmentHeight() function – a raycast (line trace) to first check if there is anything in front of the player (i.e. don’t try to adjust the crouch height if crouched in front of a wall out in the open), then check the space in front (raycast from bottom to the player’s default crouch height), and if that fails then check with a spherecast to check if the player is underneath anything already. This returns whether the hit was successful and the height at which to adjust if it is.

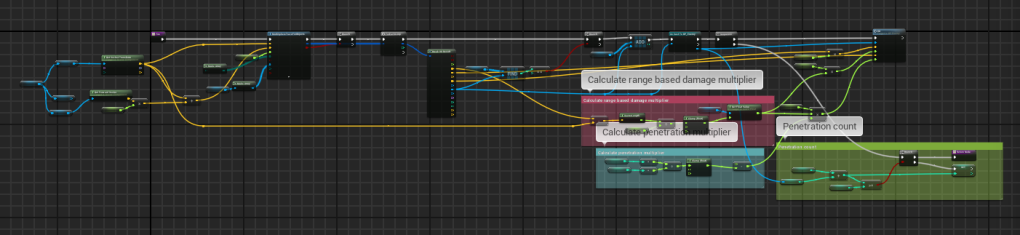
Locational Damage & Pistol Damage Mapping
I also laid the groundwork for applying location-based damage multipliers on the enemies through the standard damage system in order to allow for more tactical damage (which fits into the immerse sim style of gameplay). For example hitting the head will vastly increase the damage caused, whereas shooting the foot will cause significantly less damage. This system uses scene components which store the necessary data I need and allows me to attach this data to the enemy’s skeleton bones via the socket attachment system, meaning I can also tag which bones can be dismembered (only on death currently to avoid having to creation variations of animations).
This is the code which uses the built-in function for finding the closest bone to a location which I can then pass to my own function to find the closest bone up the hierarchy which has the locational based damage data. As usual my scripting is standardised into re-usable functions (which also allow to abstract functionality into local scope) and exposed via an event to allow for execution latency and to pass in the required data I need (i.e. base damage, location hit, impulse to apply on death for visual feedback etc).
This system also adds support for blood splatters which basically extend the base particle and decal actors to allow me to spawn decals which internally handle the animation of blood, as well as spawning blood decals from particle collisions.
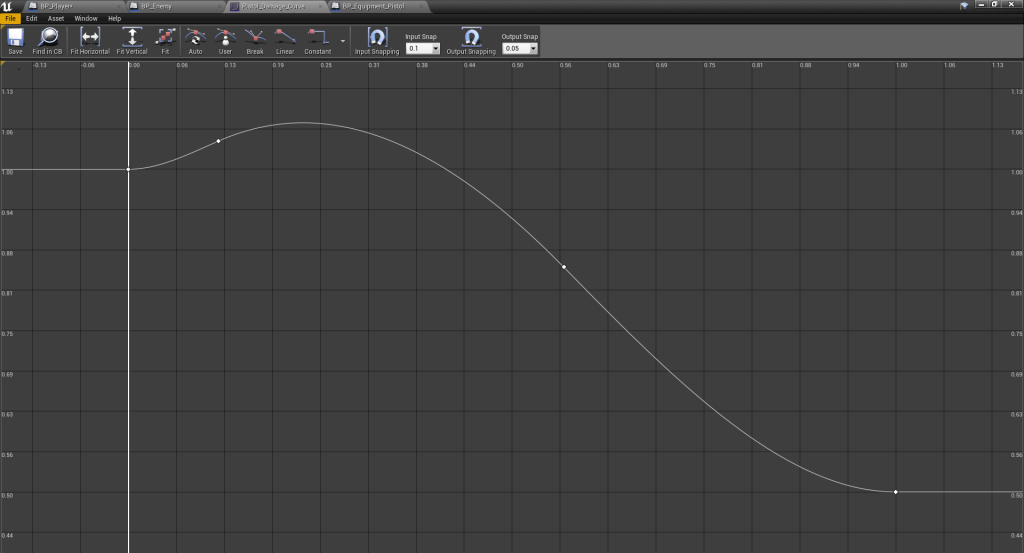
The pistol has also been reworked to utilise this overhauled system, as well as added features such as bullet penetration (for hitting multiple targets & adjusting damage accordingly), a damage curve to remap the damage to over the firing range, and applying an impulse to enemies upon death. This also utilises sphere-casting to emulate the spread of the pistol and to feel the most responsive (as projectile-based can cause problems).
Building Tiler & Improved Material Overrides
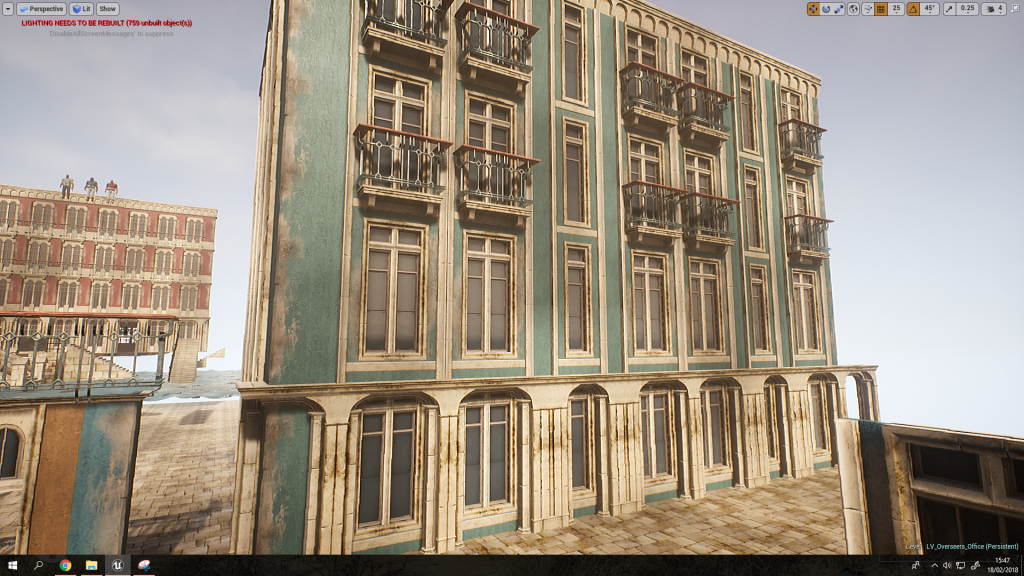
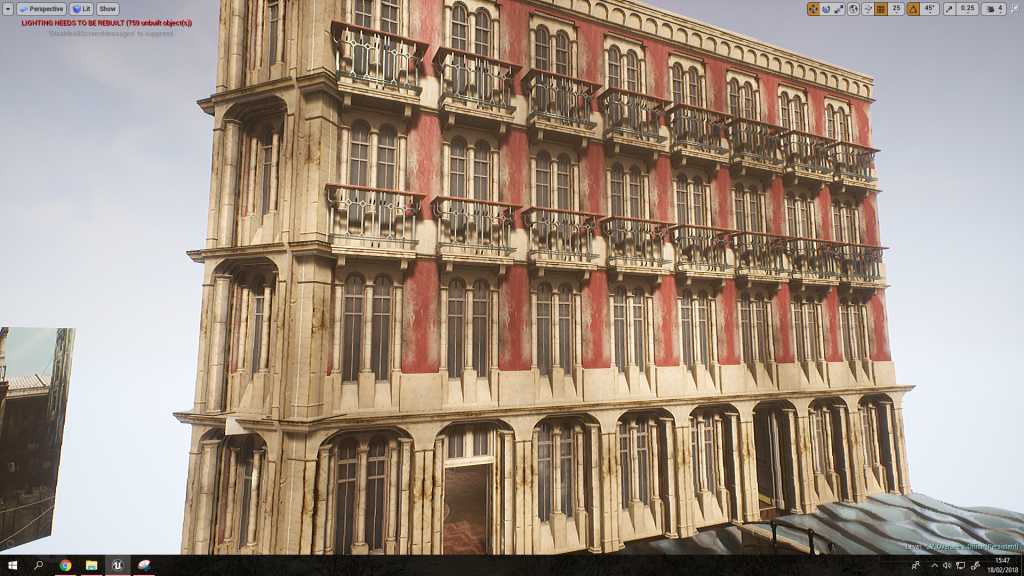
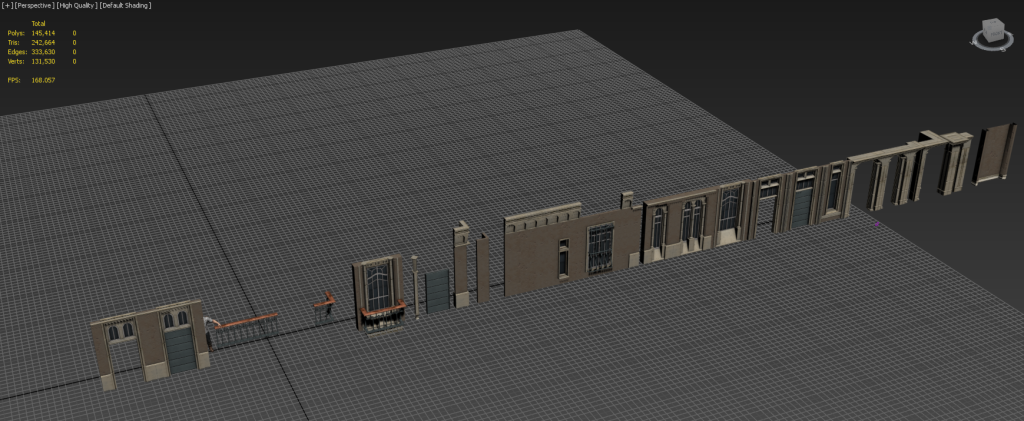
The reworked building tiler system now allows for a lot more control than before so that I can easily block in spaces using existing assets, provide variation easily in a controllable manner, and override materials. I also reworked the system to tile walls, corners, and whole buildings with an option to spawn in a procedural floor & roof section at the top – this will help to add vertical gameplay into the level blockout.
With that system in place I was able to create to create these 2 buildings incredibly fast (the second one was built around the existing interior). Creating the red building took approximately 3 minutes with all the systems set in place to generate as it was incredibly easy for me to adjust and line up everything – doing this by hand with just individual static meshes would take incredibly longer and would be a lot more difficult to apply changes to – this allows me to be very free in the look-dev stage.
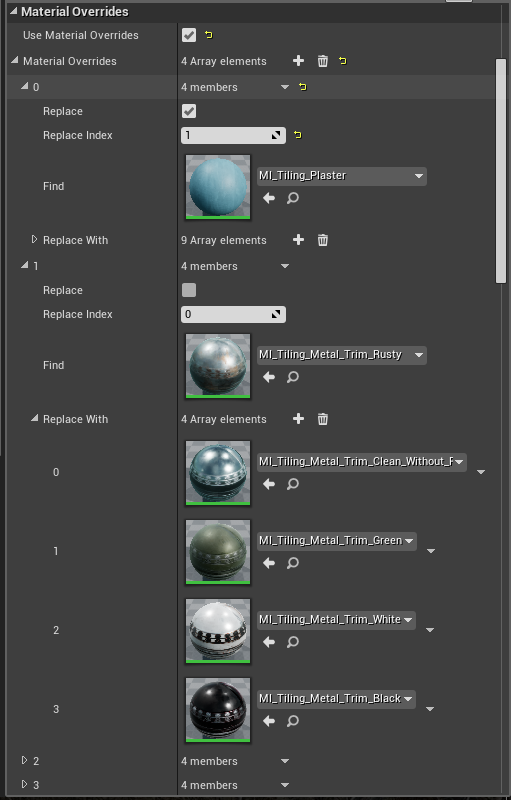
The material override system has also been reworked to help accommodate these changes as I’ve began to test the pipeline further. Such problems I found were that as the previous system relied solely on the order of materials it meant I had to keep everything in the same material IDs – and some modular pieces would break this pattern if they didn’t require a material unfortunately.
To combat this I instead created a new struct which stores the material to find (this is stored as an array of MaterialOverride types), and a list of materials which can replace it, along with an index to pick which material to replace the material that was found. For example inputting a metal trim would allow me to very easily replace all instances of that metal trim with any other variation of metal trim I have (i.e. navy, black, white, rusty, clean etc) – this goes hand-in-hand with my environment production pipeline which involves heavy use of material instancing.
Building Pieces & Pipeline
I have developed a fair few modular building pieces of a higher level of architectural complexity now the pipeline has been tested and solidified. Chopping and changing these pieces has never been easier thanks to the use of tiling materials, trims, and my pivot tools and batch exporter scripts (written prior to this project).
Pivot tools allows me to quickly move and copy pivots across different meshes which is incredibly handy for modular pieces.
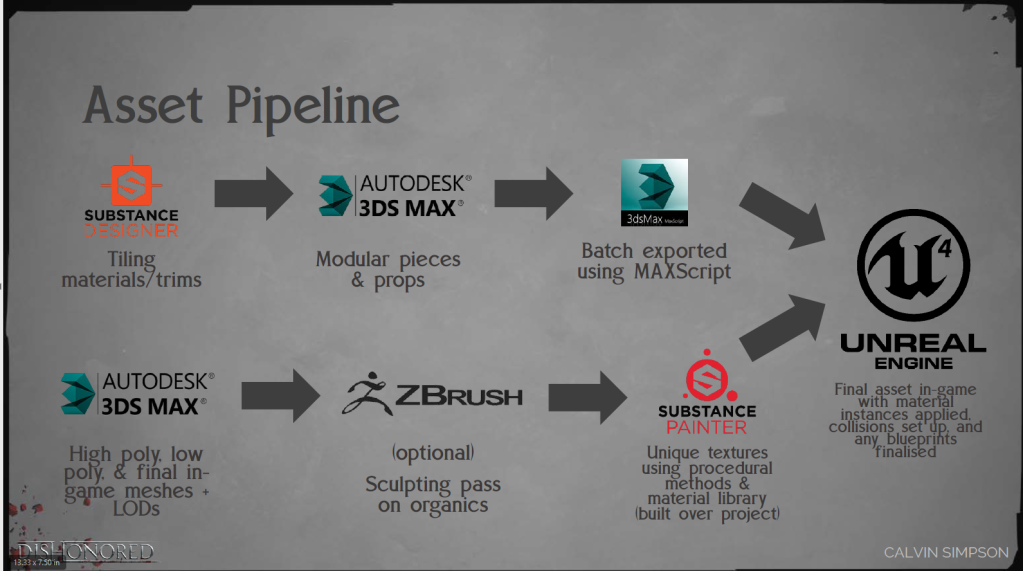
Also here is a visual representation of my art pipeline – it’s extremely important to note how optimal it is due to automation and removal of multiple software packages which would otherwise cause bottlenecks. As a technical artist keeping this pipeline optimal but powerful is one of my prime duties and thus I felt it was important to show this as well as note that there is a lot of back and forth between UE4 and 3ds Max for the modular pieces pipeline.
Abilities – VFX Concepts & Design
Over the last couple of days I have been prototyping the VFX pipeline for creating effects by first developing a procedural blood shader and splatter effect, and then using those potential limitations and possibilities in mind with how to approach the effect when developing the concept art for these effects.
*The gameplay design around these abilities are subject to change as the project progress.
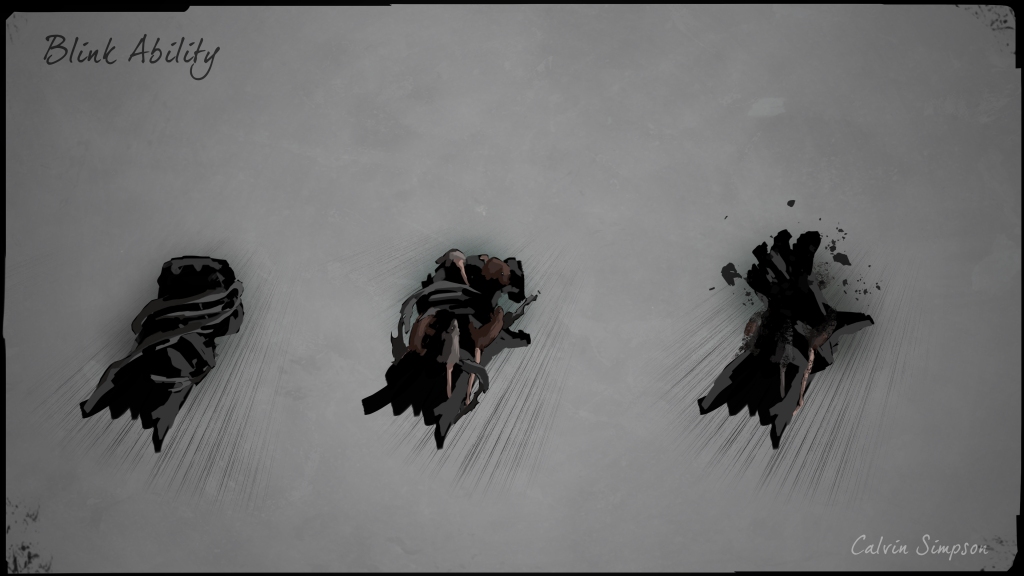
Blink
I redesigned the blink ability first with bringing something new and dark in mind, so I have made it so that smoke tendrils will rise up the arm with rats appearing and then being shattered into dust as the player blinks forward to their new position. The player will then rise out of a scurrying pile of rats which will be used to show the point the player will be blinking to before they pull the trigger.
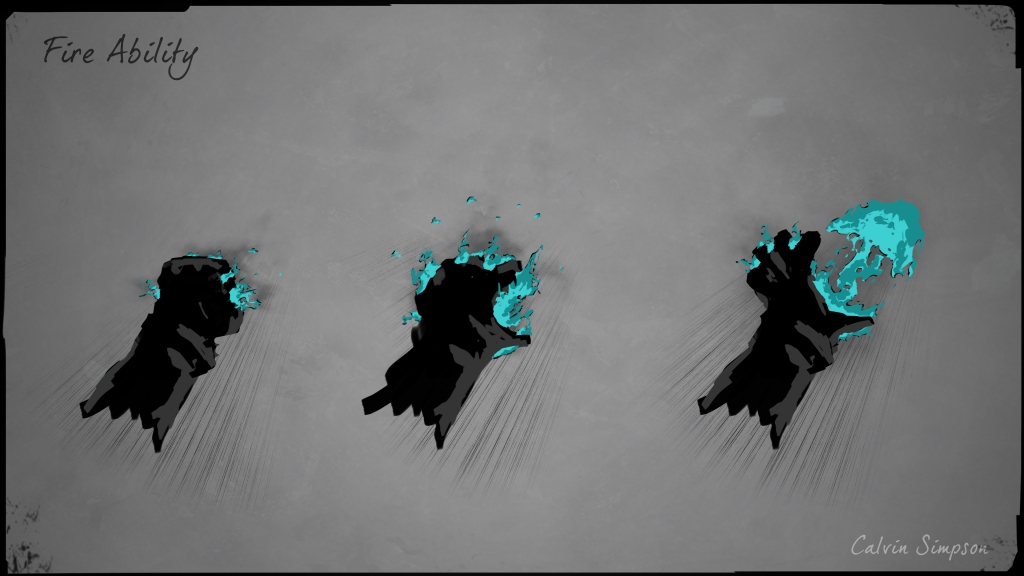
Fire
The fire ability is pretty standard but I did some experimentation with the colour in which I decided to go for a nice hot cyan instead of the atypical orange/red fire. This makes the fire feel mystical and even hotter like a blue flame.
The player will use this combat centric ability to throw a fireball which will set enemies on fire and melt their skin if it’s a killing blow (tap), or provide a radial area of damage around the player (hold).
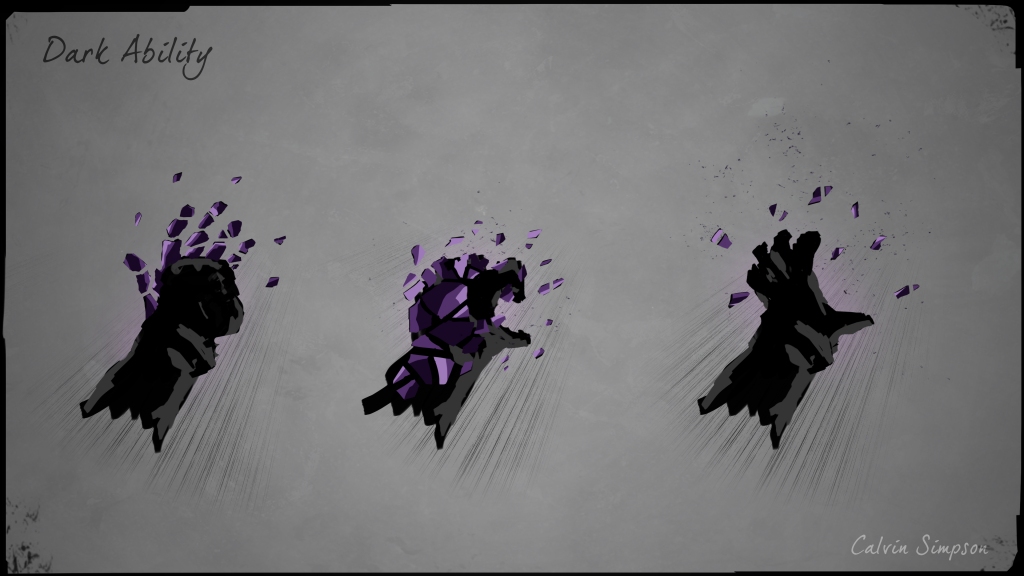
Dark/Mirror
The dark ability will appear as a hand coming form the player’s sleeve, and releasing will shatter this into fragments/shards. This ability will be used to slip into a dark plane by having the player appear to trip – this will be used to evade combat quickly by slipping into an alternate mirror reality for a brief period of time. Alternatively holding the ability will allow you to switch places with another enemy – this can be used to lure enemies into traps, displace across a distance to escape, or simply in combat to displace an enemy at a height or into water.
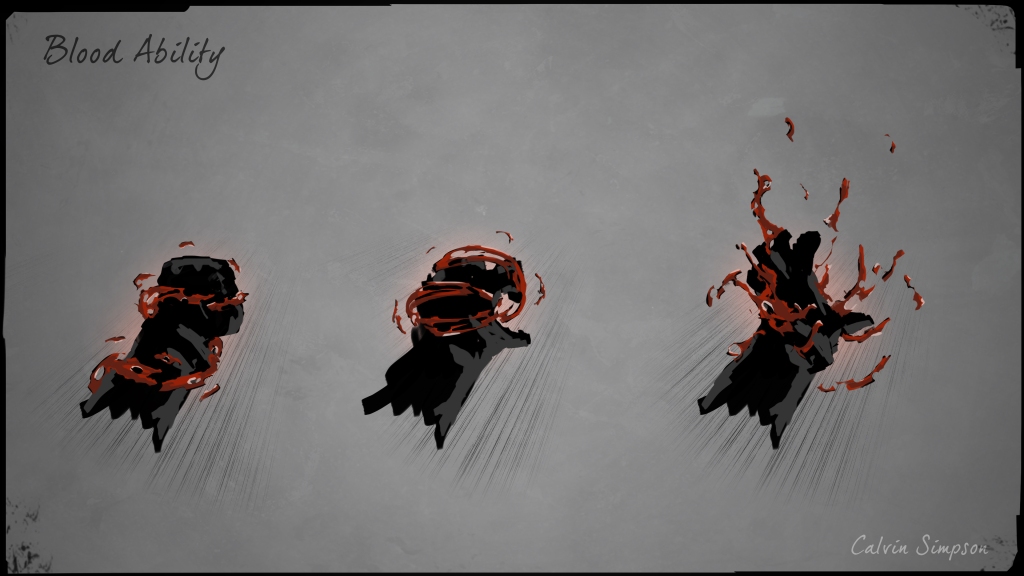
Blood/Time
The blood ability can be either used to replenish health by using it as a stealth attack on an enemy (tap), or to manipulate time (hold) to almost a halt – though this will drain health and mana.
Week 3 – Environment Art & Shaders for Days!
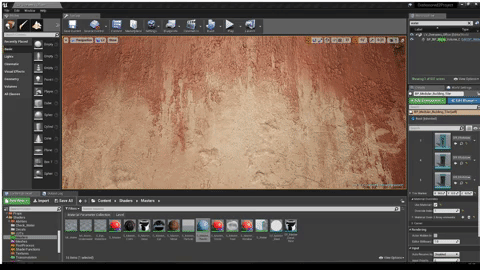
This week’s focus has been entirely around the environment art and level design pipeline, where most of my time has been spent in Substance Designer creating procedural materials, and setting up environment shaders using the base master shader system previously set in place.
I have also started developing another level design tool to vastly speed up the workflow of placing and changing buildings (go to the end). I also heavily apologise in advance to anyone reading – this week has been beyond productive (great for me) so there is a lot to say!
PCG – Substance Designer
To speed up my workflow I use PCG (procedural content generation) a lot, and part of that workflow is setting up tools to re-use and speed up my workflow even further, as well as produce substances which can be re-used easily as functions.
For example creating stone/rock/concrete based materials is a very common occurrence for most projects, and this one is no exception – so to speed up the look-dev process I have condensed the usual process of utilising the slope blur node with noise maps and then adjusting all those settings and adjustments to the 2 inputs into a single node with all the default values set up to values more pertinent to my use-case and a lot more controls all within a single node.
While it may seem like a small graph – it is a huge time saver and speeds up the look-dev process a lot and allows me to make very small scale layers of different types of wear. These bricks for example utilises that node a lot of times on a small scale to build up the detail without becoming too noisy.
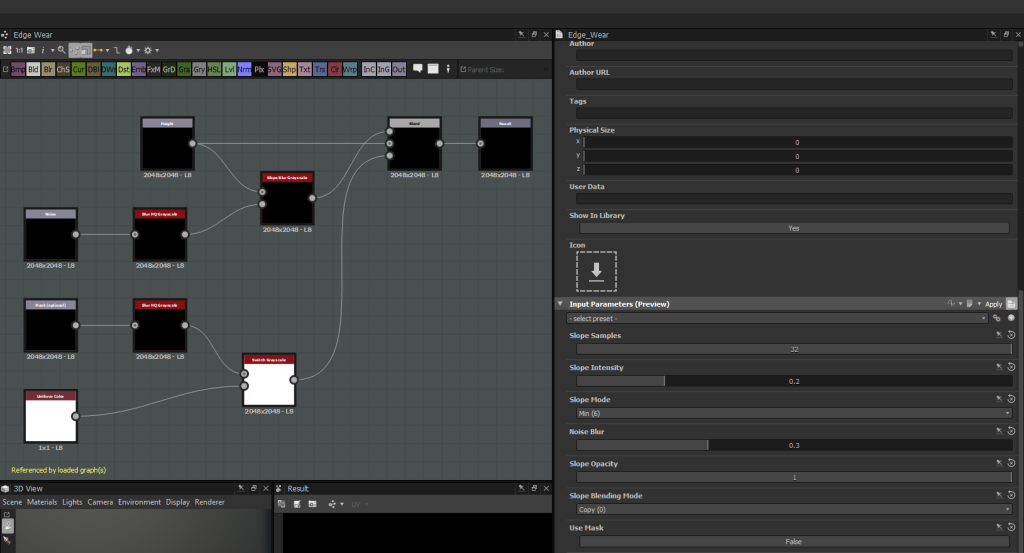
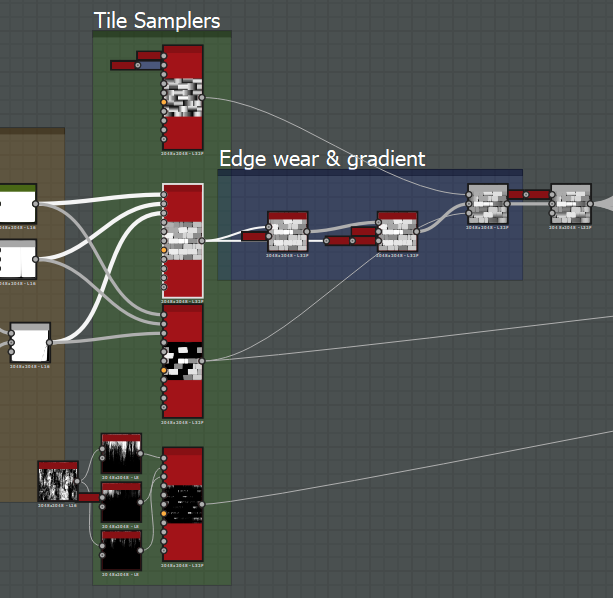
My general process for this substance is my default workflow where I will use a tile sampler to define the large shapes and general pattern first, and then refine the pattern inputs (will still being on the basic grey-box stage) to get the normal and height maps right (normal map is derived from the height – which is the focus).
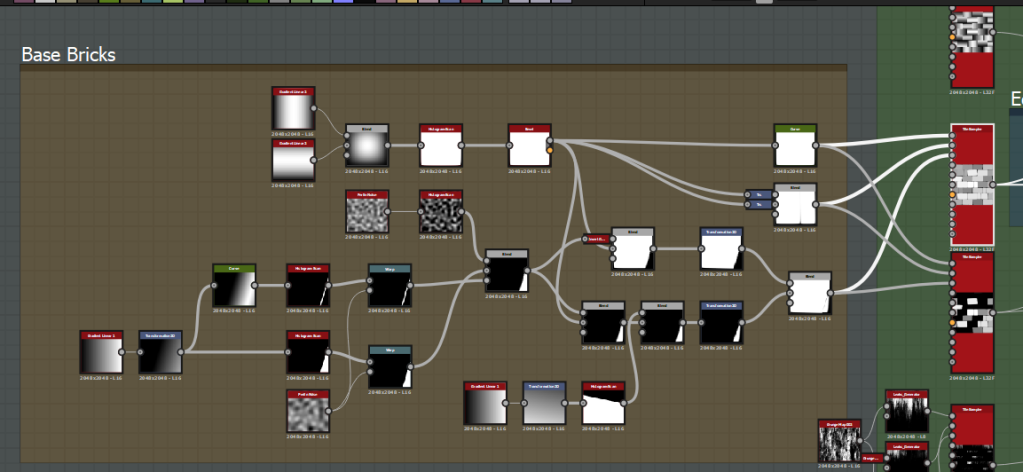
I then expose the parameters of the base tile sampler and duplicate the tile sampler node for differing inputs which all follow the same base parameter inputs (so they all line up). I then alter the scale, rotation, colour variation variation values etc to add micro-variation, and depending on the substance I add more inputs (I did here to add a cracked brick variation). This is all then blended with edge wear and gradient tiling to add different slopes and variation.
I then extract the normal and AO maps, then curvature sobel and curvature smooth from the normal map. The albedo is first generated by blending the height map with some grunge, and running it through a gradient map to remap the grayscale map into a colour range (I start quite subtle and desaturated with some variation). I then start adding in detail for this specific substance in the cracks and adding dirt, leaks etc. My process always uses the curvature maps overlayed on the albedo to add in the cavities and edges (which is still physically accurate) and the ambient occlusion map slightly to add a bit more depth (as the style requires it). In this case I also use the normal map to define the tiniest bit of directionality in the texture (again for the Dishonored style). Some final touches are made, a dirt/moss pass is added, a slight slope blur is applied for the painted look, and then the texture is sharpened.
The roughness map is a similar process of levelling out the height map, overlaying noise, overlaying ambient occlusion to occlude specularity in deeper areas etc and finally sharpening.
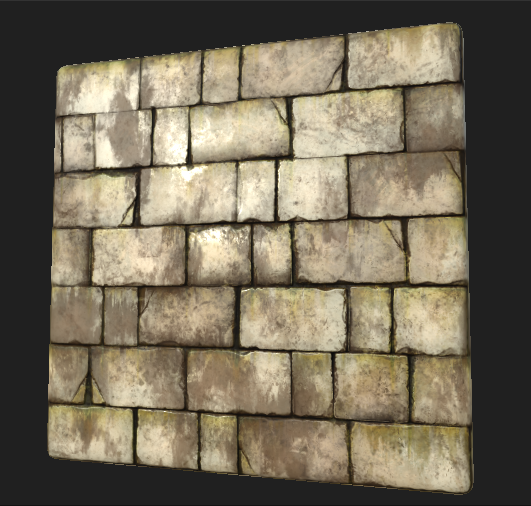
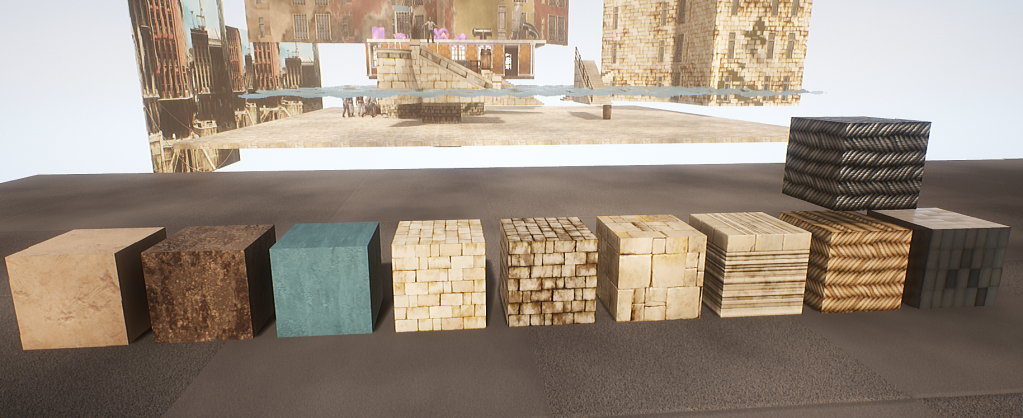
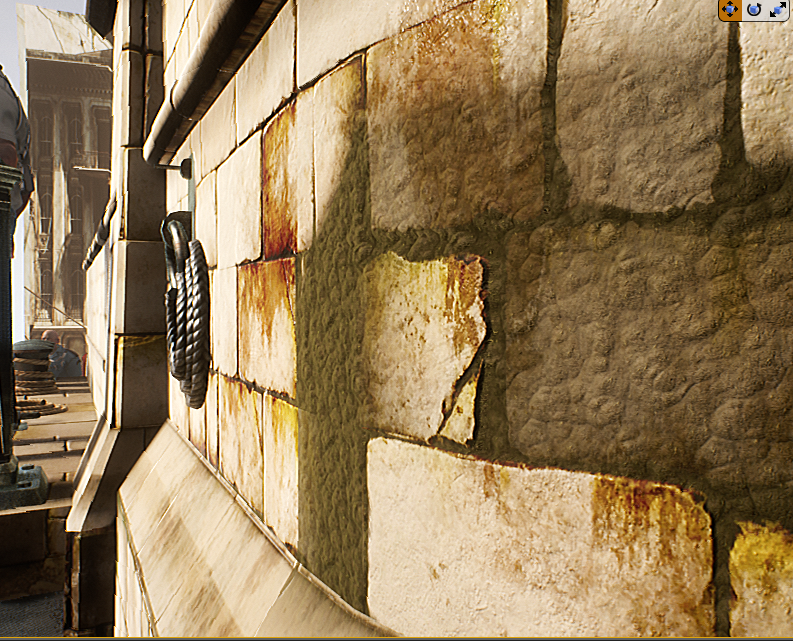
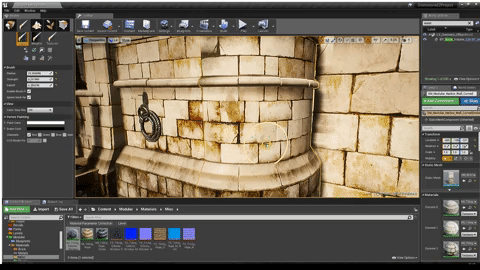
These are all the materials I ended up with in the end (not including variation instances apart from the rope instanced as steel cable). They all went through the same Substance Designer workflow with the exception of the stone trim (3rd to the right) which was done in 3ds Max > ZBrush (for edge wear) > Substance Designer, and the painted plaster (3rd to left) which is entirely procedural in the shader. All of these utilise all the shader features I set up previously and vary these properties in other instances, as well as some of them utilising vertex painted texture variations (clean to dirty plaster for example).
Modular Pieces
With all these materials set up in my master modular 3ds Max file (which were broken down from heavily analyising reference images into the core of what I need) I was able to easily create these modular pieces and testing them in-engine. I waited until some of the previous textures (the stone ones specifically) to be completed first as the modelling requires me to first apply the textures in many cases to keep it tiling – otherwise it would have caused me to have to re-work blockout pieces which is unnecessary in a one man team where I would have had to do this eventually regardless.
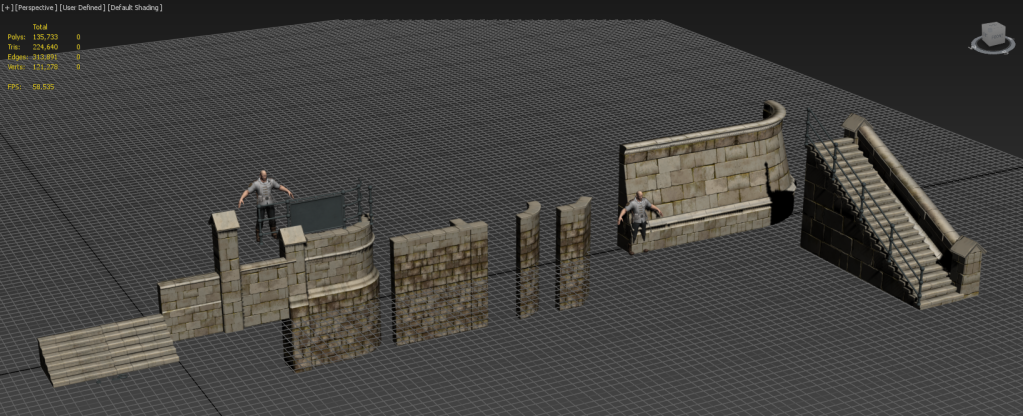
I’ve also started working on basic buildings to test the building pipeline and scale – more complex pieces and variations will be brought in as this further solidifies.
To test how they fit together, collisions, climbing functionality etc I have a lot of back and forth between UE4 and 3ds Max (which is made easy with a batch exporter I written before this project in MAXScript). The general texturing workflow involves me modelling with what I want to use on which textures in-mind, applying the right material IDs, then unwrapping around these areas. This often involves a lot of planar and cylinder maps, and flattening a lot of other areas in order to pack and move them onto certain shapes and bevels.
Trims & Material Instances – Why?
The advantage of this environment workflow is it heavily reduces draw calls as I’m not generating unique textures for everything. It also allows me to create many small props using these materials and still retain a very high level of detail at a very fast pace.
Doing this also allows me to very quickly vary up the look dev and add in variation using material instancing (which re-uses the textures in many cases, keeping variation textures to a minimum to save on texture memory).
When I’m defining what I need to make I first define real world materials of referencs and what makes up what I need, if there’s too much going on or it’s too unique (like many props are) then it requires a unique texture set, otherwise I will utilise this workflow to gain and immense amount of high quality detail. Using material instancing also allows me to link them up to gameplay using physics materials – for example different materials are set up to trigger different footstep audio based on the physics material of that material instance.
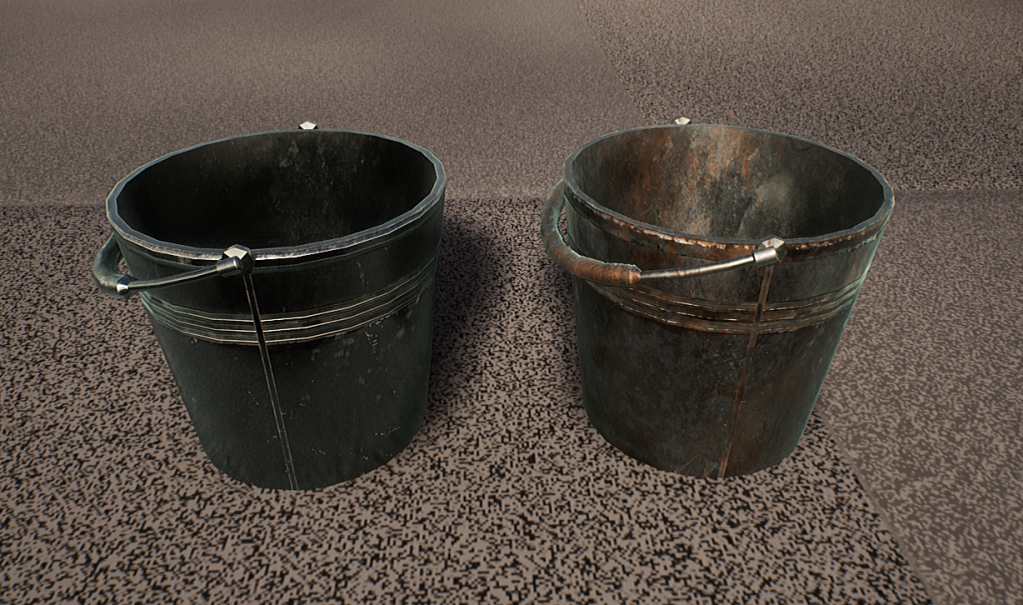
This bucket for example is made using trims very quickly and is varied up using the rusty metal trim instance.
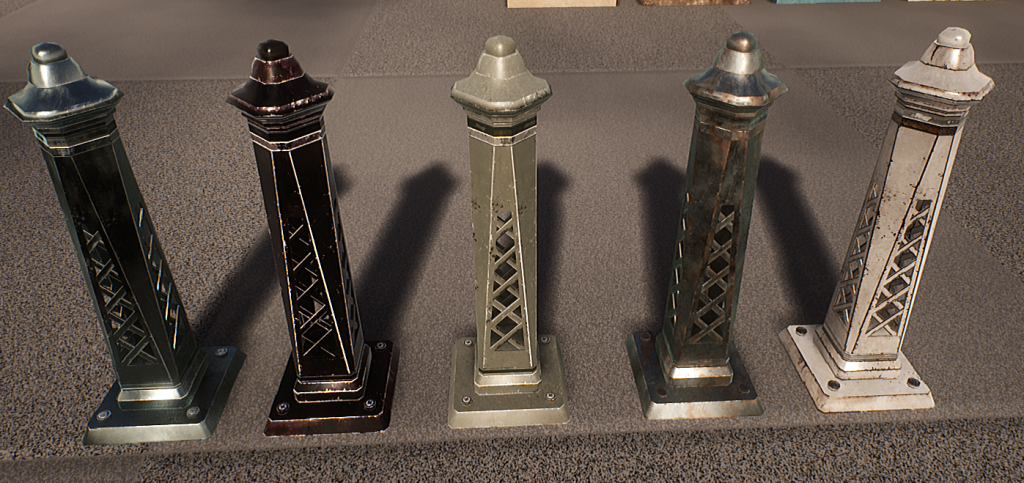
Or these bollards which demonstrate this workflow on props perfectly – where these all use the same set of materials (and a rusty variation set) but completely changed up within the material instances without changing the textures. These were originally made for the pipes but they demonstrate how the workflow even allows me to retain edge wear because of how I’ve applied these textures and how the textures were made – no fancy tricks (for me anyway), just HSV & contrast adjustments to the albedo, and levels to metalness and roughness values.
Detail normals are also used on most of these instances to give them that slight boost in detail when up-close (they are faded out based on an adjustable camera distance). This fits in with the style to give the detail needed when up-close to be believable, but also not noisy when viewed from a distance. Roughness grunge maps are also offset randomly based on the world position of the object, meaning it will automatically give a slight variance to each prop without me doing any work other than moving it.
Using this workflow has allowed me to produce incredible amount of environment of very heavily re-usable props and modular pieces in such a short amount of time (with a lot of help with the shaders – more on that next).
Shaders for Days!
Anyone who knows me will recognise my love and passion for shaders and their beautiful combination of high level art-based workflow with basic interaction with the GPU – here is no exception and all of my work this week pivots on the use of shaders.
This week specifically I have developed a master shader for stone to add moss, master shader to add paint (and strip it away) on plaster (for buildings), a randomising decal atlas shader, a master window shader with a reflection offset interior, and a screen space underwater caustics shader.
That’s a lot to digest so it’s best to break each one down first, and I’ll talk about the screen space underwater with the water volumes as there’s some more tricks there.
Master Stone – Moss Blending
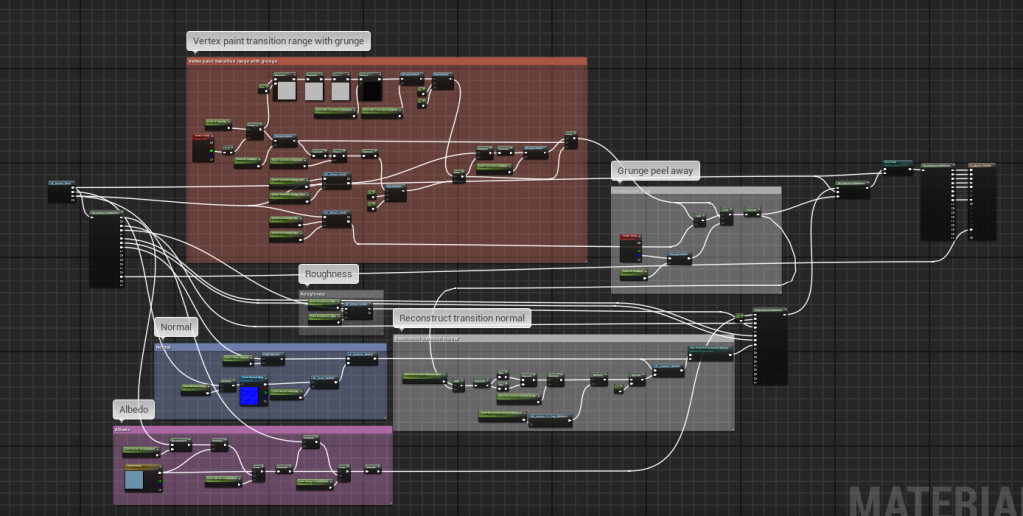
To expand the functionality of the base master shader I added moss blending for stone, where this supports fuzz shading (helps give the moss that specific look), colour, roughness, 2 layers of normal etc.
This is very easy to adjust as the moss is being reconstructed from the moss I made in Substance Designer which is packed into 2 texture maps to save on texture memory and texture fetches. The first map stores the greyscale/curvature/ambient occlusion/larger greyscale maps all in one texture in RGBA with DXT5 compression, and another texture map which packs the RG channels of the microdetail and larger detail normal maps into RG and BA respectively. This is possible for normal maps as the blue channel is often devoid of detail and is usually about 1 – meaning approximating the blue channel as 1 when reconstructing the normal and remapping into -1 to 1 space will have very little to no change. I did this on the normal maps to adjust the larger bubble-like detail and micro fuzz detail independently – meaning I can create different moss types in material instances.
This is backed up by parallax offset using the packed greyscale map as a height map, and the base functionality of painting in variation textures (for thinner moss leaks).
Master Plaster – Paint Blending & Stripping
Similar to the moss blending I have default to a dirty plaster material built into the base master shader functionality which is useful for adding worn areas towards edges and at the bottom wear the plaster would dirty and erode away.
To expand this functionality I have made it so the plaster material defaults to being completely painted (for the sake of buildings and easiness) and you can use vertex painting to erode away the paint, and blend in grunge maps to wear the edges of the paint away. This is all done by re-using the grunge maps calculated for roughness variation in the master shader and only one normal map for the paint – the rest is done through blending in albedo and roughness values on-top without any extra textures so that it remains optimal. The albedo of the paint is also varied using the grunge maps to add that slight variation, and by default the plaster material is projected using triplanar projection as it makes the most sense for large scale buildings.

To further emphasis the look of it being paint I have a detail normal for the paint which is blended on-top of the base plaster normal (which is flattened by an adjustable amount) to give the illusion of multiple layers of paint.
And to give the paint more depth when up-close I constructed a procedural tangent normal to blend in by getting the delta rate of change between neighbouring pixels for the transition calculation using DDX and DDY – this quickly helps me generate a tangent normal where the worn away edges are to make the paint appear like it is on-top and remain procedural. This effect is again scaled on camera distance so it doesn’t appear too noisy from far away.
Master Decal Atlas – World Position Randomisation
Vertex painting can only get you so far so I’ve started my decal workflow with a randomising decal shader which randomly offsets the currently selected frame in the texture atlas based on world position.
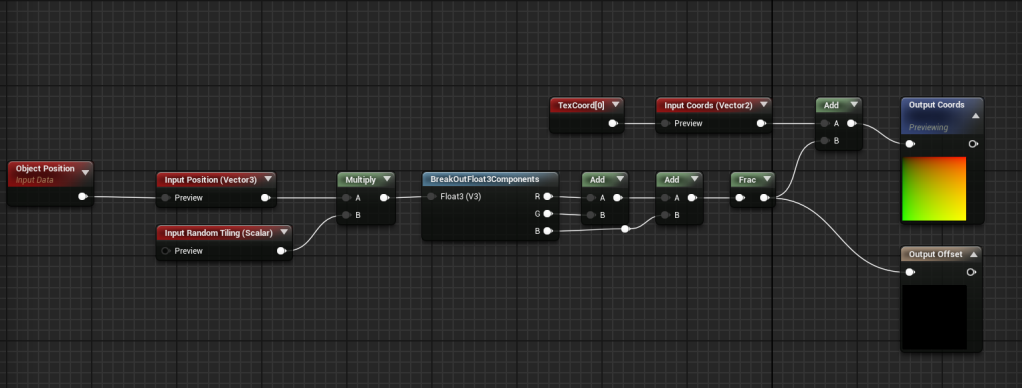
This random offset is calculated by multiplying the world position (or object position for decals) by an amount (to increase or decrease how much you need to move before it changes frame), and then adding the XYZ components together, and getting the fraction to get a pseudo-random value between 0 and 1.
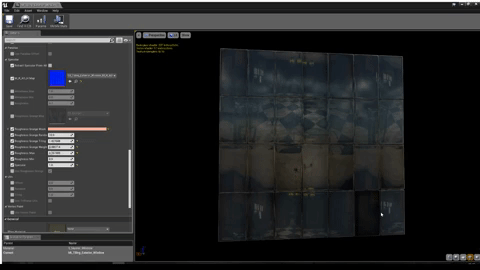
To actually create the leaks I created a Substance tool which generates leaks using input noise maps to distort and directional blur a pattern generated from the built-in waveform node. I then just used these nodes with different inputs (and randomised seeds) to generate the maps I need and input into a node which generates an atlas from its inputs.
I didn’t make the atlas node, you can find Atlas Maker here – https://share.allegorithmic.com/libraries/18
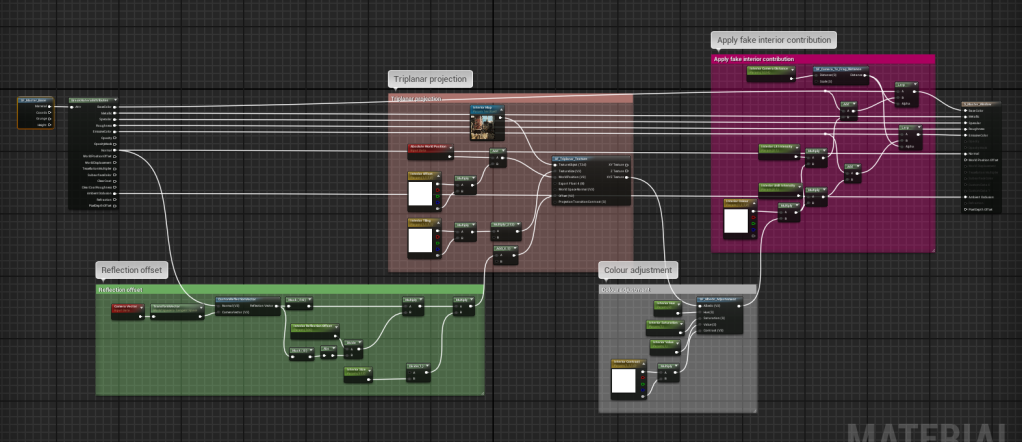
Master Window – Fake Interior
This shader simply takes an input texture map and samples it in world space using triplanar projection and then offsets the coordinates using a technique similar to parallax (bump offset) but with the vector travelling through the mesh for a more accurate effect. The result is then added to both emissive and albedo outputs and can be varied up easily, where I plan to accept an atlas instead and randomly choose a frame based on world position (similar to the decal atlas shader).
On-top of that the shader is very specular and glossy, as well as having a dark albedo to hit the right amount of energy conversation to get the effect I want.
This effect is also enhanced by the slight variation in the normal map which is used when sampling the reflection vector in tangent space, so intensifying the normal map applies an offset to each tile of the window. And to prevent too much repetition, the effect is scaled based on camera distance to the current fragment (pixel) so that it fades out at a distance where you shouldn’t be able to see it regardless.
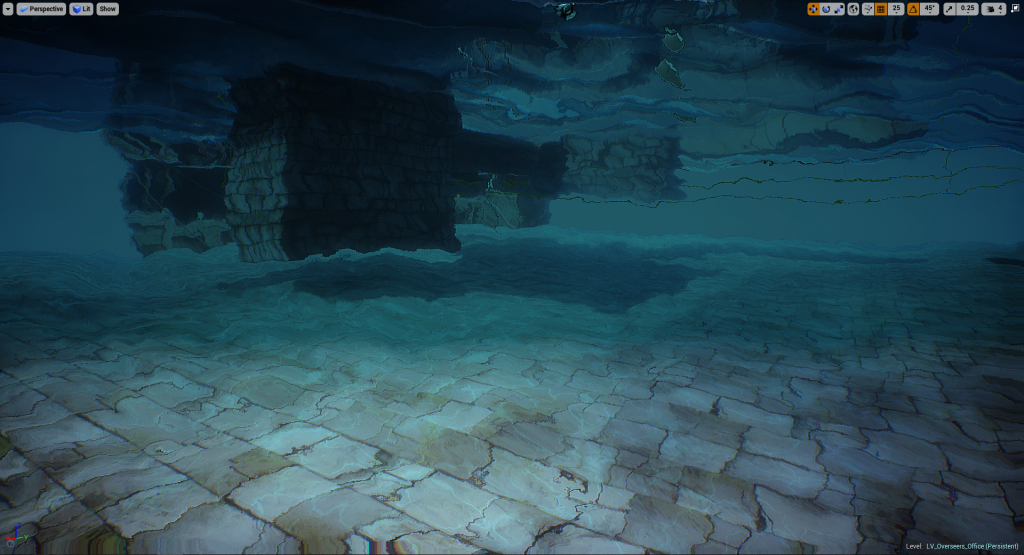
Water Volumes
I created a blueprint to handle large bodies of water visually and gameplay-wise, where it uses a physics volume to actually handle the swimming aspect (built-in support with the default character controller).
Visual-wise when underwater it uses a post process volume scaled to the same size as the physics volume (all handled in blueprint so you just scale the volume and it will work), with some post process effects and 2 post process shaders to apply the distortion effect, and screen space caustics with added depth fog to give the illusion of light being brighter in front of you. The caustics are done simply in a texture which is panning 2 noise maps to distort the coordinates of the caustics cells texture, and the base coordinates are simply grabbed from the world position buffer so they are mapped in world space – I did this to avoid having to create a material to handle caustics or use decals and light functions which would mean having to add lights/decals underwater and dealing with overdraw.
To keep the water volumes optimised I have the top water plane being calculated with masked dithered opacity which is cheap and only has overdraw where it intersects with objects (to give the fading effect), but the plane when underneath is the same plane but flipped (so it flips the normals) and renders that plane instead of the top one (and vise versa when above) due to it being culled by backfaces in the winding order.
This means I can have the plane be translucent when underwater using material overrides on the water material instance to force it to be translucent and retain all its values to give it that specific look-dev on the waves etc.
To get to the point of why – this is so I’m only paying for overdraw when I really have to which is when you look up underwater. Below is the shader complexity (which rises with overdraw) of the framebuffer when above water (left) and below water and looking up (right).


Building Tiler – Level Design Tool
As I’ve been pulling in new modular pieces and tiling materials, there has been no better time for me to start developing a tool to speed up the level design workflow as it comes round. A big part of the environment consists of buildings which can be tedious to place piece-by-piece hand-by-hand, so this blueprint handles the tiling of pieces in X and Z (across and up) by dragging a marker gizmo in the editor.
This blueprint essentially tiles these meshes based on pattern meshes – which are defined easily by an array of static meshes. So dragging out the marker will tile the modular pieces in the order they appear in the array, and you can store multiple patterns and flick between quickly for easy randomisation. I also added support to offset the pattern so you can easily vary up or move pieces around but in a predictable and intuitive way.
As with the scrollable sets this also supports material overrides which will be very helpful when creating different coloured buildings.
Where Now?
This week has been very art and level-focused in order to save time down the road as many of these tasks are dependent tasks which other tasks depend on before being able to start (such as the level itself).
Next week I will bring the focus back to VFX and gameplay by starting to concept the abilites, refine the blink ability, refine and add more enemy character animations – and I’ll see what else it brings!
Well done if you made it this far, I again I apologise for the long blog post but this has been a productive week and I hope this helps anyone reading with a further insight into a game-ready environment workflow.
